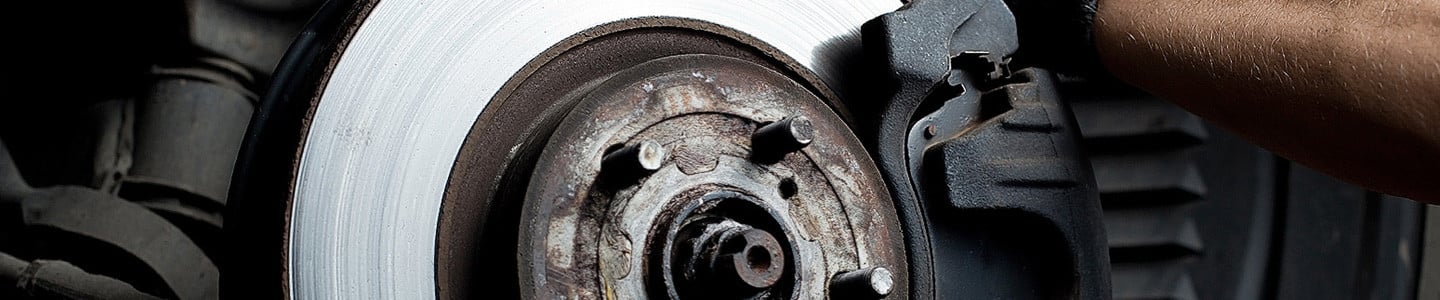
Disc brakes have been the most common setup on modern vehicles for decades, with just about 100% of today's vehicles using them in the front, and many cars and trucks also equipping the rear with disc brakes. The brake pads are the wear items which will need attention sooner or later; there will be wide variations in brake pad life depending on the vehicle, driver, driving style, etc., but rough estimates are that front pads will need attention every 15,000-30,000 miles, with rear disc pads lasting 50,000-100,000 miles.
Two very important considerations for your disc brake pads are: 1) you want to replace the pads before they wear out completely (go "metal to metal"), as once the brake rotors are scored, you will more than double the repair cost; and 2) while any repair shop can service the brake pads for you, the parts and labor cost can quickly add up. For some vehicles, the "per axle" charge can easily exceed $250 or more.
Here is a little secret the auto repair industry would rather you did not know: replacing the brake pads yourself is not difficult, and doing it yourself can save you money. In fact, even with a slight investment in tools, expect to save 50% or more over a dealership's cost to do the same job.
Once the time has come (see our related helpful article "Is It Time For New Brakes?" to determine if pads are all you need), replacing just the pads is a relatively simple automotive repair. Because basic tools are used and no electronics are involved, there's really no reason any beginner can't do the job after purchasing a set of quality parts. In the scope of this article, we'll help guide you through the process. We also invite you to look at related articles we've published about brakes that cover special tools for brake repairs and a glossary of brake system terms.
Loosen Wheel Lug Bolts / Nuts

Because brake pad replacement is a wheels-off repair, it's important to break your wheel nuts/lugs loose while the tires are still on the ground. Applying the necessary torque with a lug wrench is much easier at this point, because the weight of the vehicle prevents the wheels from spinning freely as you attempt to loosen things. One you break the lugs free, loosen them only a little more, not a lot.
Secure The Vehicle With Wheels Off The Ground

Because it's essential to replace left- and right-side pads and rotors in pairs for the front or rear, you'll want to have at least two jack stands so that the entire front or rear of the car can remain elevated safely as long as necessary. A good vehicle jack makes the lifting process easy, and chocks for whatever wheels are staying on the ground will play a vital role in preventing the vehicle from rolling as you wriggle components loose. Since you'll be working at a low height just off the ground, a wheeled creeper will prove very comfortable for sitting and sliding around on to reach for tools.
As a best practice, work on only one side of the car at a time, keeping the other side completely assembled. In a worst-case scenario, you can use that side as reference when performing the job.
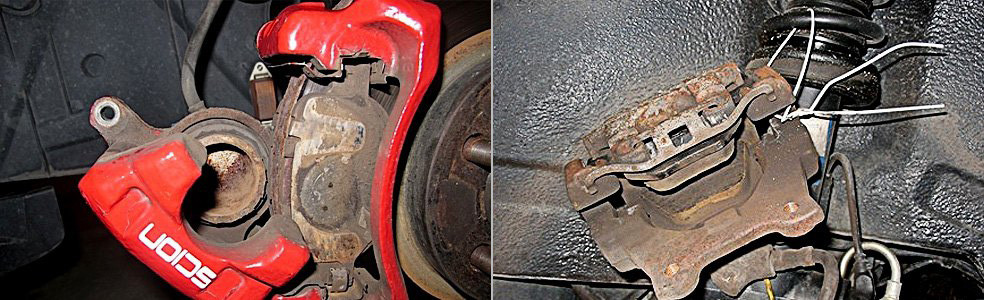
Remove Brake Calipers From Their Mounting Brackets
Once your wheels are off, you'll get a direct look at the brake calipers themselves. Note that disc brake calipers are bolted to a mounting bracket, and that mounting bracket is bolted to the vehicle (you'll see a separate set of bolts for each of those applications). Since you'll just be replacing pads and not the rotors, you only need to remove the caliper from the mounting bracket. The bracket itself can be left on the vehicle. If rotors were being replaced, the bracket would need to come off.
Floating vs. Fixed Brake Calipers
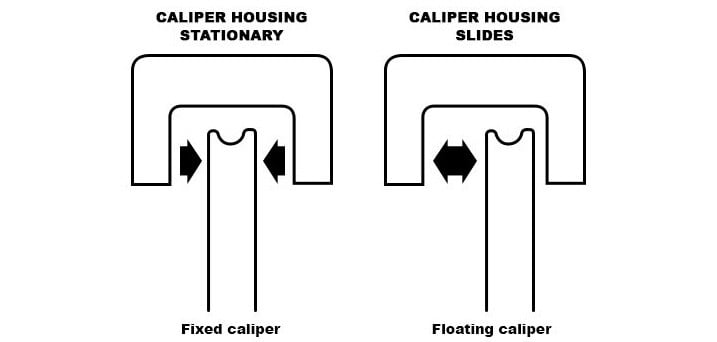
The vast majority of vehicle calipers today are "floating calipers". A floating caliper housing is designed to slide on guide pins from side to side over the brake rotor. This allows one single piston to squeeze brake pads on both sides of the rotor. When the piston moves outward, the inboard pad contacts the rotor first, causing the caliper to slide over until the outboard pad makes contact with the rotor. When the brakes are released, the caliper self-centers itself over the middle of the rotor again. Since floating calipers have fewer parts and are less complex than fixed calipers, their lower cost, lighter weight, and more compact size makes them feasible as standard equipment on most cars and trucks.

In contrast, fixed calipers remain stationary because they're fixed in place over the center of the brake rotor. They do not slide on pins the way floating calipers do. For this reason, fixed calipers must have caliper pistons on both sides, while floating calipers can get away with having only one. Because they provide increased braking power and quicker application speed, they're usually found as standard equipment on high-performance automobiles, and are available as a performance brake kit upgrade.

A good set of socket wrenches or open-ended wrenches is essential for breaking the bolts loose that secure your caliper to its mounting bracket. If you've got a floating caliper, these bolts (a.k.a. "pins") also allow the caliper and pads to slide on them across and back as brakes are applied and released. For this reason, caliper bolts must be cleaned and coated with a fresh layer of brake-specific anti-seize compound. Doing so provides necessary lubrication for brake pads to slide easily. Inspect the small rubber boots at the end of the caliper bolts to ensure they aren't torn and allowing road grit to enter. If they do need to be replaced, we've got you covered with new ones in our brake part accessories section.
Some calipers may require a hex-head or Torx head socket bit to remove the bolts. Once the caliper is unbolted, use a wire hanger or plastic zip ties to hang the caliper and properly support its weight. This will prevent stress and damage to the flexible brake fluid hose connected to it.
Remove Old Brake Pads From The Caliper
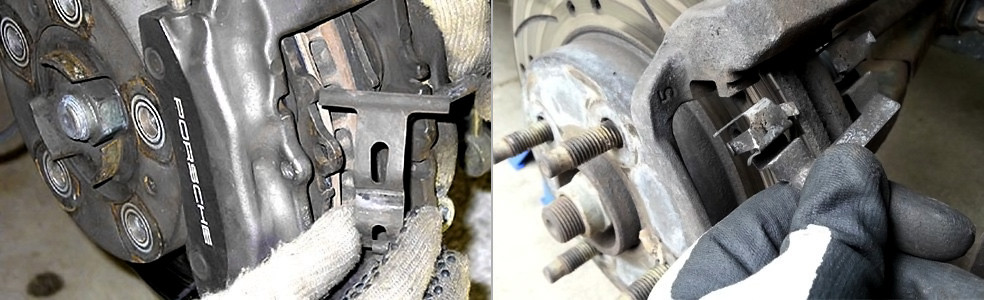
Brake pads are secured in place on the caliper by the use of spring clips. These clips can vary in design and placement, and they must be removed with a pair of pliers before the old pads can be taken off. If you're not sure how the clips on your specific vehicle are meant to be detached, we recommend consulting online repair instructions or your vehicle manufacturer or on how to do so. Some brake pads are designed with tension clips on the rear of their backing plates. These pads may need to be wedged loose with a small screwdriver.

Resetting The Brake Caliper Pistons
After pulling the old brake pads out of the caliper, a caliper piston reset tool (also known as a "disc brake pad spreader") will make it easy to compress pistons back into their housings. This is necessary because, as old pads wear and become thinner, the piston(s) extends further out to compensate. New brake pads are much thicker, so there won't be enough clearance for the brake rotor unless pistons are pushed back in. Reset tools attach to the caliper housing, then allow you to squeeze a handle (similar to a calking gun) or turn a wrench to move a plate which slowly presses the piston(s) back in.
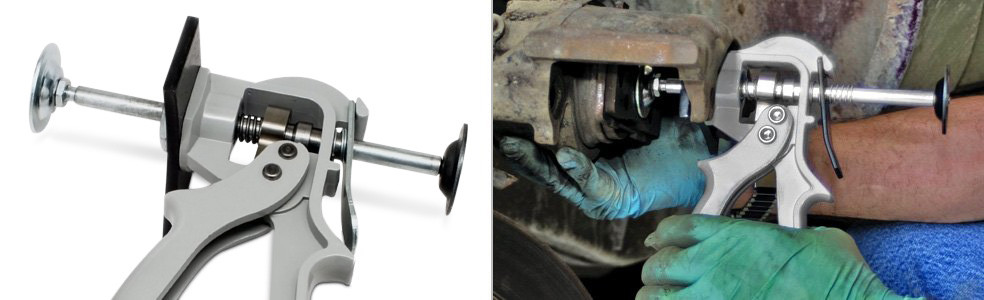
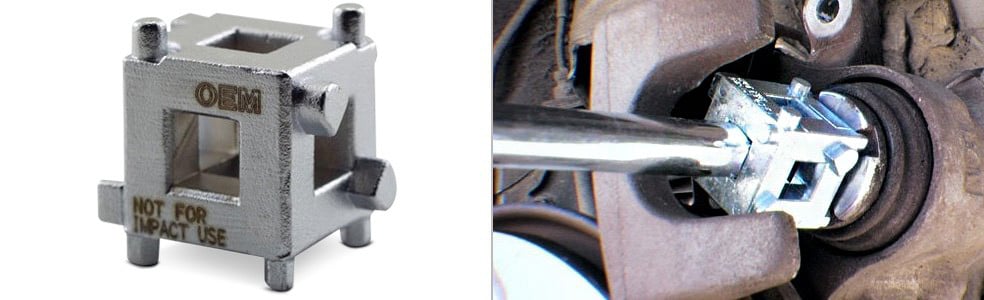
Depending on vehicle application, some caliper pistons may need to be rotated (or "rewound") back into the caliper housing - a specially designed universal adapter piece will make that process easy. Should you own more than one vehicle, you can consider a kit that includes adapters in multiple sizes.
Note! If you or someone has recently topped off the brake master cylinder, watch this fluid level as you compress the pistons! The act of moving the pistons back into their bores will also push brake fluid back to its reservoir. You may need to loosen the reservoir cap, or even siphon off some brake fluid to prevent it from spilling.
Installing New Brake Pads

Once caliper pistons have been compressed, you're ready to install your new brake pads inside the caliper. Before inserting them, coat the backside of the brake pad backing plates with brake paste to quell brake pad vibrations, rattles, and noise. Be sure none of this lubricant gets onto the friction surfaces of the pads or rotors! If this is new to you, be sure that the friction side of the brake pad is facing the rotor. The backing plate side of the pad faces the piston.
Next, you'll be taking the caliper and fitting it over the top of the brake rotor as you place it back into the caliper mounting bracket. Because wider new pads narrow the clearance, you may have to wiggle the caliper to get it over the rotor initially. Bolt the caliper back onto its mounting bracket. Note that, depending on vehicle design, you may need to re-insert your spring clips before installing the caliper bolts.
Repeat all these steps for the second side. Mount your wheels on the vehicle and tighten the bolts. While the wheels are still in the air, spin them by hand to ensure they rotate freely. Tighten the lugs and lower your vehicle.
Important Note: After starting your engine, pump your brake pedal four or five times before shifting out of park. This builds up brake pressure lost when caliper pistons were reset. Otherwise, you may get the shock of your life when you find that your moving vehicle has limited braking power when you first step on the brakes!