If you've ever visited an automotive dealership service department, you may have been told that your vehicle needs a brake fluid flush. Or you might have received a coupon mailer offering this service for a discounted price. Maybe you thought it was an attempt on the part of the dealer to separate you from your money for something you don't really need. After all, you have made the effort to learn more about your brakes, and you understand that occasionally, the brake pads and rotors will wear out and need replacing. However, you've never heard of a "brake fluid flush".

This procedure, however, is not a case of flim-flam. Take a look at your vehicle owner's manual. Some vehicle manufacturers never recommend a flush, while others recommend it every 2-4 years (varying by vehicle make). The important thing to remember is, brake fluid can absorb moisture, which is bad, and an occasional flush can be good preventative maintenance.
Vehicle manufacturers go to great lengths to engineer their vehicles so that they require less maintenance, not more. By doing this, they make overall cost of ownership numbers lower - a statistic that can be very enticing in product advertisements. So you can bet if a particular maintenance service is specified, the engineers that built your vehicle require it for a good reason. In the case of replacing old brake fluid with fresh fluid, it's not just important - it's essential.
What Is a Brake Fluid Flush?
It is the process of replacing all of your old brake fluid with fresh, clean brake fluid. This involves pushing the old fluid out of the entire system as new fluid is added. Creating the pressure necessary to bleed out the old fluid can be done in several ways.
- You can have another person pump the brake pedal;
- You can use a hand-pump pressure bleeder tool;
- Professional shops often rely on power flush machines, and typically charge an hour labor plus the cost of new fluid.

Pressure bleeders, whether power or manual, fit over the brake fluid reservoir and are secured in place with the use of adapter pieces. As pressure and new fluid are added, old brake fluid is removed by loosening and tightening bleeder screws at the brake caliper at each wheel.
Why Are Brake Fluid Flushes Necessary?
Most brake fluid used in production vehicles today is glycol-based. This type of fluid is "hygroscopic", which means it naturally absorbs moisture that's present in the air at all times. According to engineers, that absorption rate is approximately 1.5 to 3% a year in areas of normal atmospheric pressures. In humid climates, that rate can climb even higher. Moisture will always find its way into the lines through microscopic pores in brake hoses, seams, joints, and seals - there's simply no way to avoid it.

As brake fluid absorbs more and more water, it will begin to boil at lower and lower temperatures. Remember that brakes work by converting energy - forward motion - into friction, which is dissipated as heat. The heat in the pads and rotors eventually makes its way to the brake fluid in the hoses and lines.
Brake fluid is non-compressible in its normal liquid state – to ensure hydraulic pressure is transferred properly when you step on the brake pedal. Gases produced as a result of boiling make the fluid compress, causing a soft and spongy pedal feel and reduced braking performance. You don’t want to have a situation as severe as losing your brakes due to the pedal going completely down to the floor. Flushing the system helps keep your vehicle stopping safely and saves you from expensive repairs in the future.
While water in the brake system is the main reason fluid flushes are performed, the hygroscopic nature of brake fluid actually proves helpful in preventing other types of problems. For example, if brake fluid was not hygroscopic, water (which is heavier by weight) would pool together in pockets and gravitate to lower areas in the system such as the brake calipers. This would create a more serious corrosion problem, and those pockets of water would boil much sooner than when water is dispersed evenly throughout all of the fluid.
If the old brake fluid is not replaced at appropriate intervals, critical moisture buildup will corrode metal parts of the system, such as calipers, master cylinder pistons, and lines. Needless to say that the lines rusted to the point of pressure loss may cause the brake system to fail.

Because of corrosion, seals can go bad and leak, which in turn can result in seized calipers. A brake fluid tester is a useful tool for monitoring the condition of your brake fluid, because it senses and reports the percentage of moisture that's been absorbed.
Brake Bleeding How-To & Tools


Manual Bleeding
This old-school procedure requires basic tools and a second person to manually step on the brake pedal at designated intervals.
You'll need:
- Box-end wrench
- Transparent catch container
- Transparent fluid transfer hose
- Turkey baster or syringe
- Park your vehicle on hard, level ground. Brakes are bled with the engine off.
- Lift up your car and use jack stands to safely support it. Make sure you utilize specifically designed jacking points.
- Remove the wheels.
- Locate all four caliper bleeder valves (screws). Loosen them without applying excessive force. If they are stuck, apply some penetrating lube such as WD-40. Wait for about half an hour and try again. Don't open the screws too far.
- Once the screws get loosened, turn them snug again to keep the system airtight. You'll be working on each corner individually later on.
- Determine the correct bleeding sequence.
Bleeder screws on the caliper are opened one at a time, starting at the corner farthest from the master cylinder. This way, all of the air will be pushed out of the system. The typical sequence is as follows: - passenger side rear
- driver side rear
- passenger side front
- driver side front
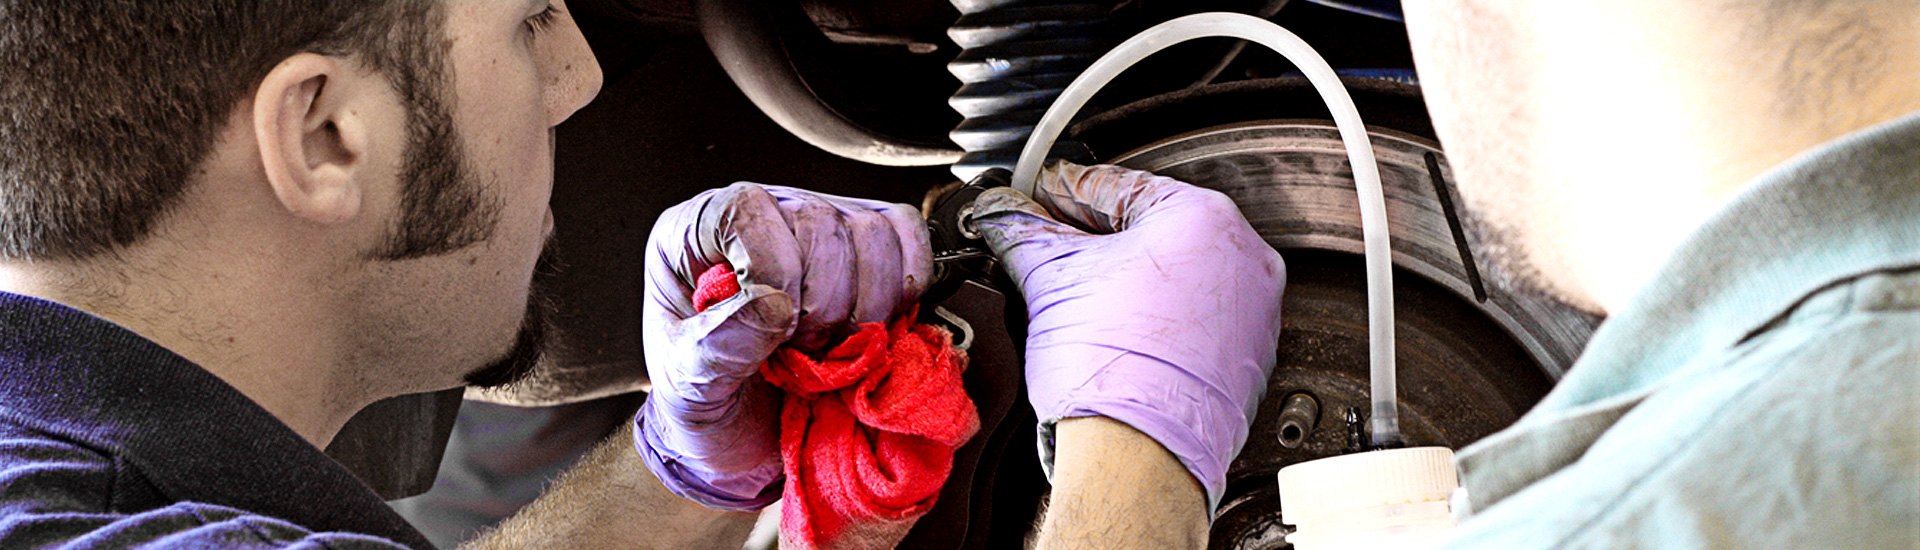
- Locate the master cylinder reservoir under the hood. Brake fluid is extremely corrosive, so cover the painted areas and underhood parts. Wear gloves and safety glasses.
- Clean the reservoir’s cap and neck to prevent dirt from getting inside.
- Remove most of the old fluid from the master cylinder reservoir with the help of a turkey baster or a syringe. Don’t empty it completely to prevent air from entering the system.
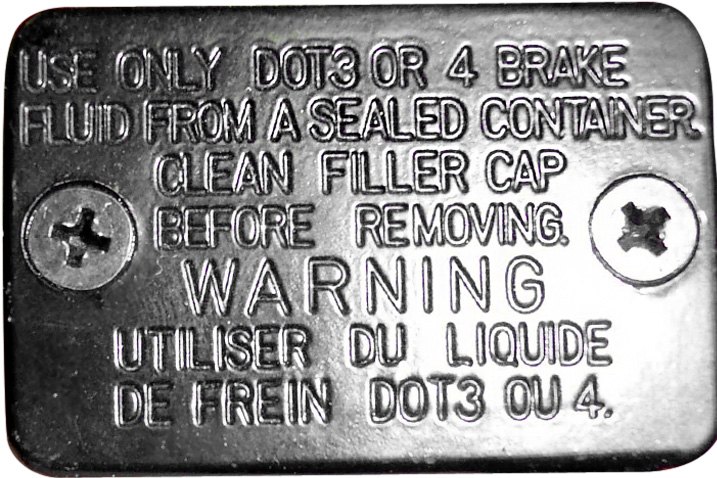
- Top off the reservoir with fresh brake fluid of a specific type that’s approved for your vehicle. During the bleeding process, you’ll need to keep an eye on the fluid level and add fresh fluid when it drops below the MAX mark.
- Reattach the master cylinder reservoir cap.
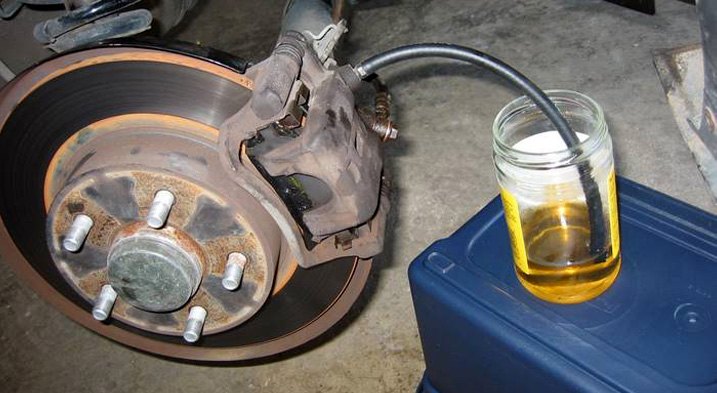
- Fit one end of a transparent tube over the bleed nipple and insert the other end into a bottle that will collect the contaminated fluid.
- Have your assistant hop into the driver’s seat. Your partner will be tasked with pushing the brake pedal, while you’ll be turning the bleed valve. Command “Push” - have them step on the pedal (3/4 travel) until the pedal feels firm, most commonly 3 to 5 times. Once a solid feel is achieved, your assistant needs to hold the pedal down to maintain pressure and command “Pressure.”
- Open up the bleed valve with a wrench. The old fluid with visible air bubbles will run down the tube into the bottle.
- After the pedal is fully depressed and brake fluid has flowed out through a tube that's submerged in a container of old fluid, the bleeder screw is closed so that air does not get sucked back into the lines when the pedal rises back up. The pedal will sink down as the fluid will be draining out. Right before it reaches the floor, the assistant commands “Down” for you to quickly close the screw. After that, the pedal can be released.
- Check the master cylinder reservoir and add fluid if need be so that new fluid continues to come out of the lines.
- Repeat steps 13-16 until you see the stream of fluid is clean and bubble-free.
- Repeat at the other corners following the designated sequence.
- Once done, test the pedal to make sure it doesn’t feel soft and spongy.
- Mount the wheels back on. Go for a test drive to make sure your car or truck stops properly.
Pressure Bleeding
This process involves purging old brake fluid and air out of the system by using a canister with a built-in hand pump. More advanced power bleeders rely on an air compressor. A pressure bleeder provides a faster and easier way to get rid of air and debris in your brake lines without the assistance of another person.
You'll need:
- Brake bleeder
- Box-end wrench
- Transparent catch container
- Transparent fluid transfer hose
- Turkey baster or syringe
- Perform steps 1-10 described above in the Manual Bleeding section of our guide.
- Fill the bleeder tool's tank with fresh brake fluid. Reinstall the pump cap and connect the pressure bleeder to the brake fluid reservoir.
- Pressurize the system by actuating the hand pump. Watch the pressure gauge – about 15 PSI is optimal.
- Attach one end of the fluid transfer hose to the bleed valve at the caliper that comes first in the bleeding order. The other end of the hose goes into the catch bottle.
- Open the bleeder valve. Watch the used dark fluid flow into the catch bottle. A stream of nice and clean brake fluid will indicate all of the old stuff has been pushed out of the system and you can close the valve.
- Refill the pressure tank before you repeat on the other wheels in the correct order. Having not enough fluid in the process means unwanted air will get into the lines.
- Test the pedal to make sure it is firm. Reinstall the wheels and take your vehicle out for a test drive to check braking performance.
We invite you to look through the Brake Service Tools section of our website. There, you'll find pressure bleeders, adapter fittings for fluid reservoirs, special bleeder screw wrenches, clear plastic tubing for draining old fluid into a bucket, and much more.
At CARiD, we firmly believe in the benefits of educating our customers about the products we sell. We invite you to browse through the Helpful Articles on our site and read the related guides, such as that describing what special tools you may need if you're planning a brake job. These articles, combined with the replacement brake parts, performance brake parts, and tools we offer, provide you with lots of leeway when deciding to either make the repair on your own or give the job over to a professional. Whichever you choose, you will be the better consumer for it.
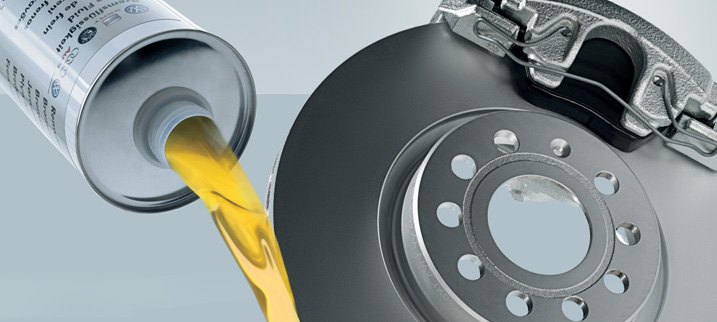
What Type of Brake Fluid Should I Use?
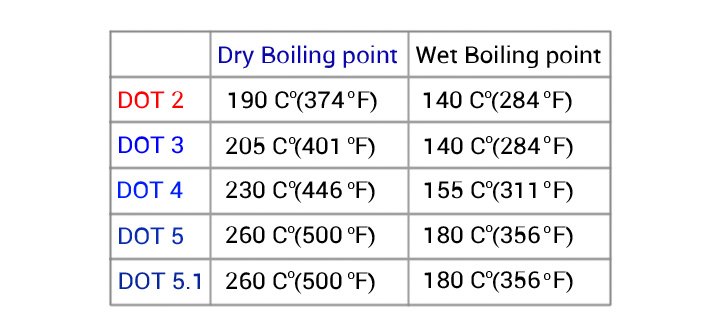
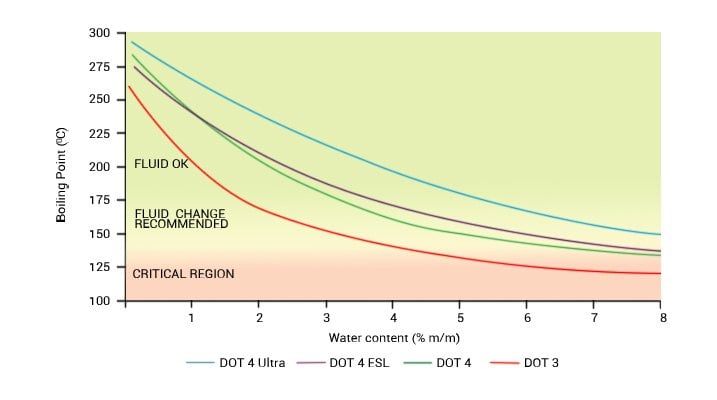
Different grades of brake fluid have different dry and wet boiling points. "Dry boiling point" signifies the boiling temperature of brand new, pure fluid with no moisture in it. "Wet boiling point" is the reduced boiling temperature of fluid that's absorbed 3.7% water. Because it only takes about two years for DOT 3, 4, and 5.1 fluids to reach 3.7% water content, doing a brake fluid flush every several years is extremely important.
The U.S. Department of Transportation (DOT) assigns the brake classifications. Each DOT designation signifies fluids have been certified to meet performance standards up to designated temperature points. They are:
DOT3 (Glycol-Based)
Commonly specified by auto manufacturers, this type of brake fluid meets criteria for glycol-based fluids with a wet boiling point of 284 degrees Fahrenheit and a dry boiling point of 401 degrees F.
DOT 4 (Glycol-Based)
Like DOT 3 fluid, DOT 4 is also glycol-based. It's suited for heavier-duty use and higher brake temperatures thanks to a higher wet boiling point of 311 degrees Fahrenheit and a dry boiling point of 446 degrees. Vehicle manufacturers of higher-performance models that see aggressive use on the street and/or racetrack often use DOT4.
DOT 5 Synthetic (Silicone-Based)
This is a recently-developed silicone-based synthetic brake fluid that has a boiling point of at least 500 degrees Fahrenheit. Because it does not absorb moisture like DOT 3 & 4 fluids, DOT 5 fluid doesn't need to be changed as a matter of routine maintenance. And like synthetic motor oil, DOT 5 fluid can cost three to five times as much. DOT 5 is NOT suitable for ABS systems because it can aerate when cycled through small orifices. DOT5 can be found in use on military trucks and heavy equipment not equipped with ABS that sit for long periods of time. Additionally, DOT5 will not mix with types 3 or 4 fluid.
According to engineers that work with brake fluids, silicone in DOT5 that's introduced into an older brake system can attach itself to sludge that may already be present due to unrelated component deterioration. This can create gelatinous glop that grows bigger as it draws other contaminants to it. Eventually, metering orifices become clogged and pistons can even stick. Engineers also say that if you've already changed over from 3 or 4 to DOT5, you should switch back. If you've ever gotten silicone on your fingers, you understand how difficult it is to wipe away fully.
DOT 5.1 (Glycol-Based)
This is the non-silicone version of DOT5. Both have the same boiling points, but 5.1 embodies all the other physical characteristics of DOT 3 and 4.
To view brake DOT3, 4, and 5 fluids that we offer, we welcome you to look through the Brake Fluids & Lubricants section of our website.