By definition, an automotive battery is an electrochemical device that stores and provides electrical energy on demand. Electrical energy is produced inside the battery by a chemical reaction occurring between two dissimilar plates immersed in an electrolyte solution. When the battery is discharging, it changes chemical energy into electrical energy and releases current. During charging, electrical energy is converted back into chemical energy and stored.
This article will guide you through the steps involved with testing, charging, servicing, jump-starting, voltage testing, and replacing an automotive battery.
Tools Needed: screwdrivers and wrenches found in a typical tool kit. Other equipment for certain functions are listed in the text further on in the article.
Servicing A Battery
Years ago, all batteries required periodic addition of diluted water to maintain proper current flow within the battery itself. In 1972, "maintenance-free" batteries were introduced with sealed battery casings that eliminated the need to add water. Both types of batteries are available today, and a quick way to spot a battery that requires maintenance is the presence of removable plastic caps along the top.
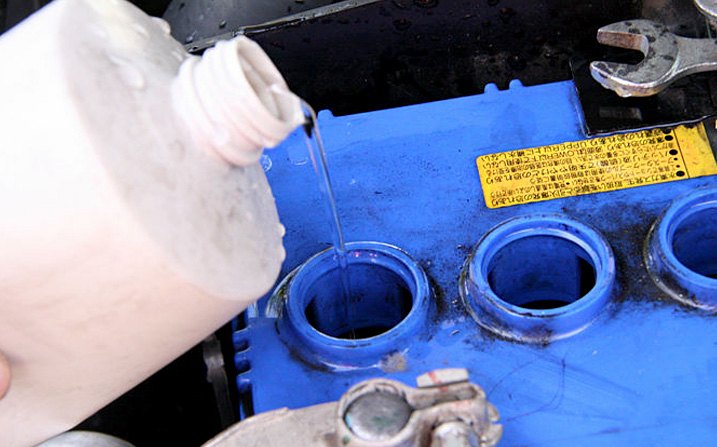
Adding water to maintain a battery requires a screwdriver to loosen the cap or caps, and distilled water is required to ensure minerals found in tap water don't interfere with chemical reactions.
Corrosion Cleanup
Sooner or later, most automotive batteries will require a periodic cleanup around the terminal posts to remove corrosion and gunk which forms naturally over time. If you notice buildup around your battery posts, it's best to get rid of those deposits to ensure electrical resistance is eliminated and proper current flow is restored.
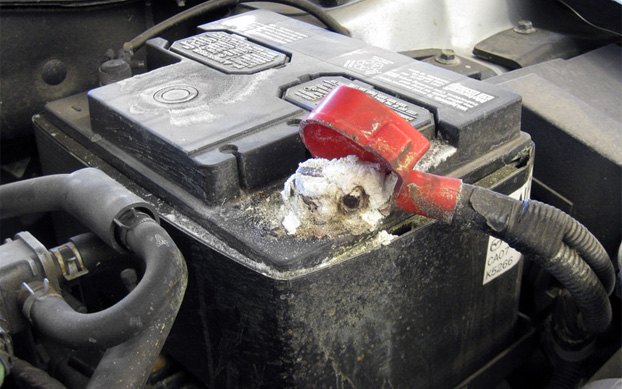

After loosening and removing battery terminals, a specially shaped cleaning tool will make quick and easy work of scouring chemical crust off of battery posts and terminals. Dealerships often charge one-half hour labor for this "battery maintenance service", but it's something you can easily do yourself. For best results, use a mixture of baking soda and water.
Checking Your Battery's State Of Charge
Maintenance-free batteries often come with a built-in window that allows you see its state of charge. As the battery discharges, electrolyte levels drop and a floating colored ball drops away from the top of the window.

An electric multimeter (also known as a voltmeter) will also allow easy measurement of electrical charge when the needle-pointed lead ends are touching both positive and negative battery posts. A voltage reading of 12.5 or more means the battery is 100% charged. Below 12.3, the battery is less than 75% charged, and below 12.1 it's less than 50% charged. Multimeters at various price points are available here.
For best results, ambient temperature should be between 60 to 100 degrees Fahrenheit and the battery should be allowed to stabilize with the negative cable disconnected for 10 minutes. For batteries that have just been recharged, a heavy draw applied for 15 seconds will remove any surface charges which can throw off readings. Turning the headlights on will do nicely.
Checking Alternator Voltage Output
It's also an excellent idea to check the output of your vehicle's alternator since it performs the vital function of charging your battery when the engine is running. Once the engine is started, touching the positive and negative battery terminals with the multimeter leads should yield a reading of 13.8 to 14.8 volts if the alternator is functioning properly.

Lower readings indicate the alternator could be on its way out and needs to be replaced. A higher reading could indicate a faulty voltage regulator is allowing the battery to be overcharged, which can lead to boil-over and eventual destruction of the battery. Either condition is certain to leave you stranded on the road, so it's a repair you'll want to address immediately.
Maintaining Your Battery's Charge Using A Plug-in Charger From A Wall Outlet
Letting a battery become discharged to the point where it's too weak to start your vehicle is extremely hard on internal components. Equally hard on batteries is powering them back up fast by jumping or fast charging. Since doing either of those things significantly shortens the lifespan of any battery, it's a good idea to avoid both through the use of chargers designed to keep things at top charge. Simply connect the red/positive clamp from the battery charger onto your positive (+) battery terminal and the black/negative clamp onto the negative (-) battery terminal to charge a battery from a wall outlet charger.

There are number of battery chargers that let you charge a battery at a variety of rates - from a slow 2 amp rate to maintain full charge on vehicles which don't often get driven (known as "trickle charging"), or within minutes at 100+ amps to start a dead battery in a hurry. Most modern battery chargers will automatically reduce the charge rate to a trickle when a battery reaches a state of full charge, so look for that feature when selecting one.
Jump-Starting A Dead Battery Using Another Vehicle

If you're using jumper cables and boosting your dead battery from another vehicle, start by positioning the helper car so its battery is as close as possible to the one in your dead car. With both engines off and keys fully in the "off" position, connect jumper cables in the following order:
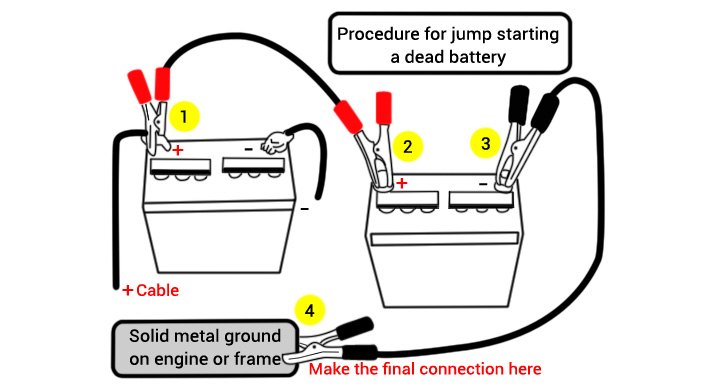
1. Connect the red (positive/+) clamp around the red (positive / +) terminal of the dead battery.
2. Connect the other red (positive/+) clamp around the red (positive / +) terminal of the good battery.
3. Connect the black (negative/-) clamp around the black (negative/-) terminal of the good battery.
4. Connect the other black (negative/-) clamp to an unpainted section of metal somewhere on the frame of the vehicle with the dead battery. Hooking the clamp to the vehicle's alternator housing will also work effectively. This serves to ground the electrical connection.
5. Start the engine of the helper vehicle and let it run for a minute so a charge begins to build up in your dead battery.
6. Start the vehicle with the dead battery and disconnect cables in the opposite order they were installed.
Replacing A Dead Battery
While batteries are designed to provide years of trouble-free service, cells within the battery become less effective and burn out over time - weakening a battery's overall effectiveness until it can no longer function. Since cold temperatures are hardest on batteries, it's usually a sudden drop in temperature in fall or winter that finishes off batteries which have reached the end of their lifespan. You may be able to jump start such a battery if you're lucky once or twice before it reaches true-death status, at which point it will not take a charge and can no longer be jump-started.

To replace a battery:
1. Loosen and remove the battery's NEGATIVE TERMINAL FIRST, then do the same for the positive terminal
2. Loosen nuts that secure the battery hold-down bracket
3. Remove the hold-down bracket's top brace piece
4. Carefully lift and remove the old battery
5. Reverse procedures for installing the new battery
If you are looking for an original equipment specification replacement battery, we recommend the Optima Red Top battery models.
"Deep Cycle" Batteries

This type of battery is designed to withstand six or more total discharges and bounce back effectively. Deep cycle batteries feature special alloys on both positive and negative plates that resist corrosion and gassing, and are designed with grid type construction internally. They're ideal for classic cars and boats that aren't started regularly and are not stored within range of an electrical outlet that facilitates the use of a trickle charger. The Optima brand of batteries are especially noted for their deep cycle batteries, available as either Yellow Top or Blue Top models.
Battery Cables
Even though cables that connect your battery to the vehicle's starter and alternator are heavily insulated by rubber, corrosion of the wiring inside does occur over time. Older vehicles may develop a low voltage condition that's present at all times no matter how charged or new a battery is. If your headlights are perpetually dim and your battery never reaches full charge, replacing your vehicle's original battery cables can be a wise decision.

Battery Gas Ventilation Tubes
For safety, new batteries come with new rubber ventilation tubes that serve to route internal gasses out and away from the battery itself. If your battery doesn't need to be replaced but you notice your battery exhaust tube is missing, cut, or has deteriorated over time, it's a good idea to replace the tube itself. Removing and installing a battery exhaust vent tube is easy because they press on and pull off by hand due to their fitted shape. Tension from the rubber keeps them securely in place.

Battery Ratings
To help you understand the terminology used on battery ratings so you can make a better choice when the need arises to purchase a new battery, we've listed the main ones below. Cold Cranking Amps (CCA) is the main measurement to go by because it determines overall battery strength. Reserve capacity and Ampere-hour ratings listed below are measurements that determine how a battery performs in emergency situations you'll probably never face.
Cold-cranking amperes (CCA) rating refers to the minimum amperes available at zero degrees Fahrenheit, and it indicates the amperes that a fully charged battery will maintain for 30 seconds after without terminal voltage falling below 7.2 volts for a 12-volt battery. To provide enough starting power under adverse conditions, a 12-volt system generally requires 1 CCA for each cubic inch of engine displacement size. So a 350-cubic-inch V8 requires a battery with a cold-cranking rating of at least 350CCA. In climates that see sustained colder weather, a more powerful battery with a higher CCA rating is recommended.
Reserve Capacity (RC) rating represents the approximate time in minutes it's possible to continue driving (with headlights on) in the event of a charging system failure. The rating is based on a current draw of 25 amperes while maintaining a minimum battery terminal voltage of 10.5 volts.
Ampere-Hour Rating is the amount of steady current that a fully charged battery can supply for 20 hours at 80 degrees Fahrenheit without the cell voltage falling below 1.75 volts, or 10.5 volts at the terminals.
Handling Batteries On Vehicles Equipped With A Battery "Power Module"
Higher-end vehicles with a more advanced level of technology may have a "Power Module" which varies the rate of electrical charge to the battery to ensure proper power is always present to run a myriad of electronic sensors, air suspension components, and other power-consuming onboard devices. As batteries naturally age and become weaker over time, the rate of current flow can drop.
Some vehicle power modules sense changes in electrical resistance and increase charging rates to the battery as needed to account for this change. Other power modules may simply adjust electrical flow based on a running time counter. If you're not sure if your vehicle has a power module, the owner's manual will tell you clearly.
On vehicles so equipped, a scan tool is necessary in order to literally tell the module a new battery is being installed - providing the serial number and part number of the new battery in some cases. The part number tells the vehicle's computer the battery's capacity and the change of serial number, and tells it to reset all parameters such as various counters, present charging rate, and other time ageing formulas. After the new battery is installed and the body module is programmed, it may still be necessary to clear initial warnings that occur.
What happens if a scan tool is not used on these occasions? An overcharged or undercharged battery will result because the charging rate is still that of an older battery. Over time, this will damage the battery and shorten its lifespan. An inaccurate battery meter reading will also result, putting the charging system into power saving stages too early or too late. A low voltage operating condition will trigger warning lights for other systems when no problem actually exists, and modules that control normal functions can perform strangely - leaving you with windows and locks that don't operate when you want them to, and operate when you don't want them to.
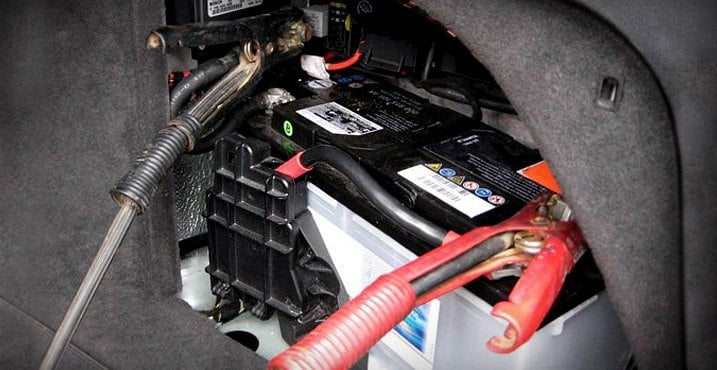
If a battery in a vehicle equipped with a power module simply needs to be re-charged because lights were left on overnight, the black/ - / negative clamp needs to be connected to the negative terminal post found on the power management controller itself instead of the battery terminal. Power modules are typically located right next to the battery - often located in the trunk on such vehicles.