
What is a V Boot?
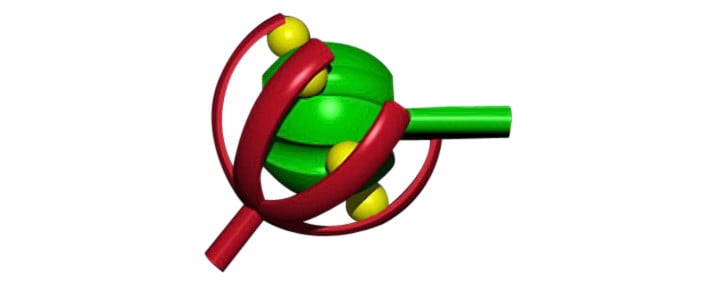
To understand the function of a CV boot, it's important to first look at what the "CV" part signifies. A constant velocity (CV) joint is a coupling found on one or both ends of axle shafts fitted to vehicles with independent suspension setups. A ball-shaped piece on the axle shaft end sits within a cup-shaped piece attached to a shorter shaft leading to a wheel or center mounting point. Ball bearings situated in between allow axles equipped with CV joints to change direction and pivot.
CV joints are mostly found on front-wheel-drive vehicles because they can best accommodate steering angle variations in addition to up-and-down wheel travel. Many modern rear-wheel-drive cars with independent rear suspension setups also use CV joints at the ends of rearaxle half-shafts, and even driveshafts in some cases.
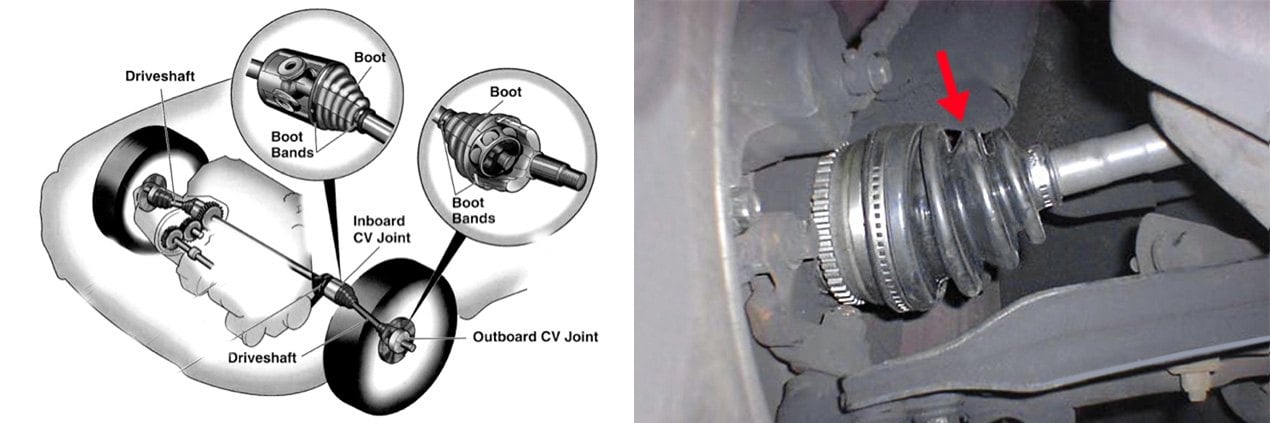
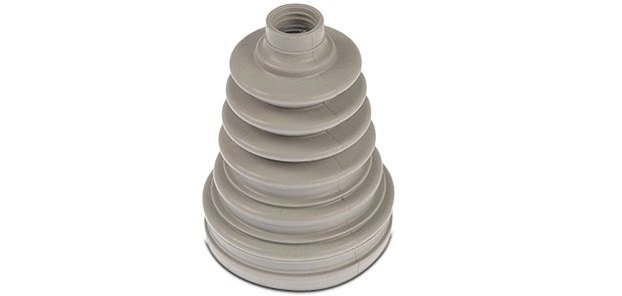
CV joints are packed withlubricating grease that allows them to operate for an extremely long time without wear. To keep this grease contained and uncontaminated from outside dirt and grit, a CV boot fully surrounds and encases the joint. Ring clamps (or "bands") on both sides of the boot maintain a tight seal. While most CV axle boots are made of rubber, some are made of other materials such as polyurethane or neoprene for increased durability.

CV Axle Boots are Subject to Wear and Eventual Damage
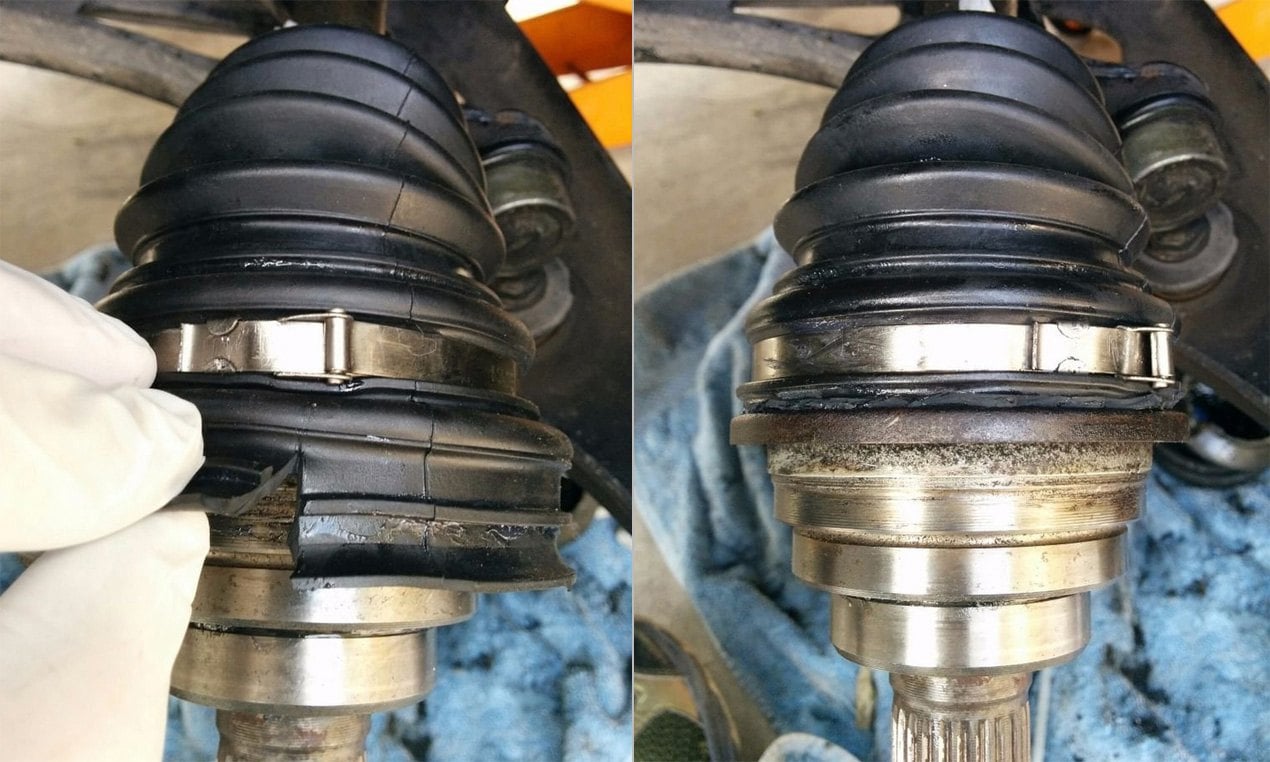
Over time, CV joints can split at the seams from normal wear, and they can be punctured by loose debris or while driving over rough terrain. Typically, cracks from normal wear appear first on outer CV boots closest to the wheels because they are subject to a greater range of up-and-down motion. In most everyday driving situations, CV boot damage occurs while driving through hard-packed snow, or on roads covered with large gravel or stones. Naturally, off-roading over rocks or through water greatly increases the likelihood of CV boot damage.
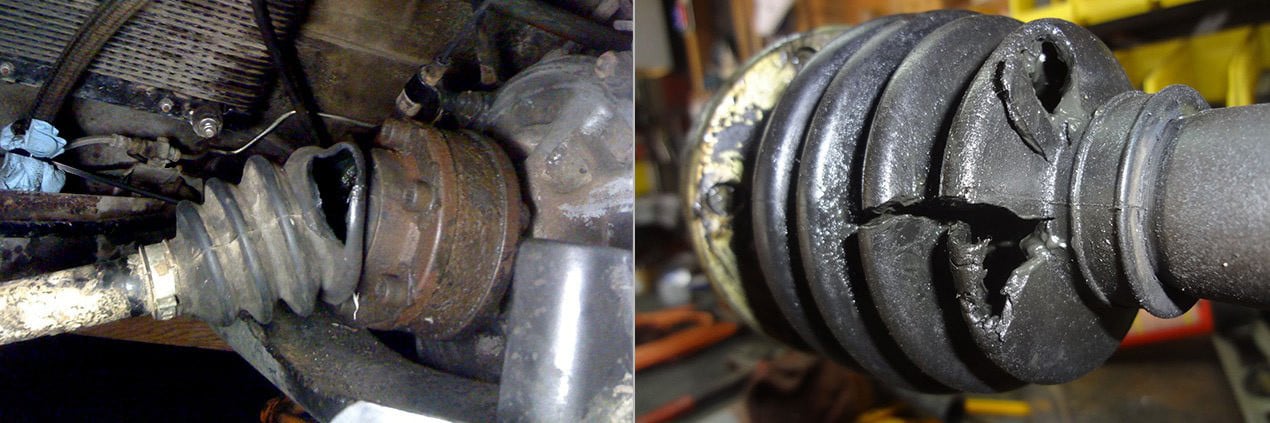
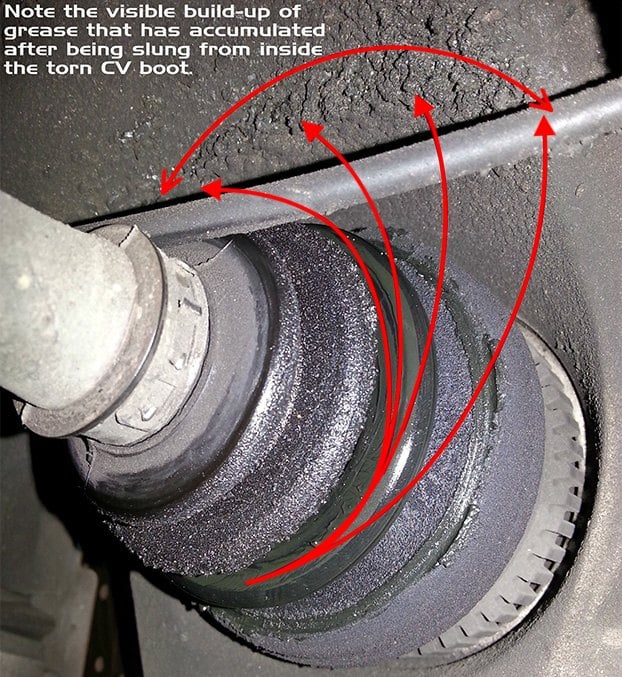
Regardless of how damage occurs, the end result is the same. Grease packed inside a boot will leak out as the axle rotates, and dirt and moisture will work their way in. Without proper lubrication, abrasive grit and corrosion from water eventually cause a CV joint to wear to the point where it's compromised and must be replaced before complete breakage occurs.

Periodic inspection of your CV boots is a good idea, because it's possible to spot a small crack or tear early on before a CV joint becomes compromised. While larger punctures will result in dark-colored grease being visibly splattered all over, catching the problem sooner rather than later means you'll be able to get away with replacing only the CV boot itself. A whole new CV joint is a considerably more expensive part to replace if the problem is ignored.
A faulty outer CV joint will make a popping or clicking noise as your steering wheel is turned - becoming louder as you accelerate around a corner. While inner CV joint failures aren't as common, symptoms include shimmying or shake from side-to-side as you accelerate. You may also notice a clunking sound when your gear selector lever is moved directly from one gear to another.
Replace The CV Boot, Not The Whole Joint
Below, we'll look at replacement CV boots found in the CV Joints, Boots & Components section of our website, and we'll give an overview of the steps involved with replacing one. If you plan to use a mechanic to make the repair, being prepared with a new replacement CV boot is still a good idea because you'll pay only for labor. Parts you'll get from us will be high quality at a good price - so you'll be spared markup on parts charged by most shops (we recommend asking for a quote on labor before discussing how you'll be supplying the part).

Our website will automatically ensure you receive a CV boot designed for a tight fit on your specific vehicle once the year, make, and model are entered in our Product Options field. Unless noted, all CV boots are "vehicle specific". Ones that are designed to fit any vehicle are noted on the product page as "universal fit".It’s recommended that you opt for a vehicle-specific product whose size ensures proper fitment and reliable sealing.
Material and Fitment Matter
The material used in CV boots is exactly what directlyinfluences their quality. They are manufactured from different rubber compounds and other materials, and quite often it's hard to say how long your new part will last even if it looks good. For instance, low-quality boots may only serve till the first frost, as many of them cannot withstand low temps. To avoid such problems, we source our inventory from trusted brands.
For starters, a popular option is the Dorman CV Joint Boot Kit which fits a wide range of American, Japanese, and Korean vehicles made before 2011. We have a variety of Mopar CV joint boot kits for cars, SUVs, and trucks manufactured from 1985 onwards.
Motorcraft CV Joint Boot Kits cover Ford/Lincoln/Mercury models back to 1986. For newer Saabs, we've got the Professional Parts Sweden CV Boot Kit. You'll also find a wide range of aftermarket offerings for Chrysler division models (including Jeeps) with the Crown CV Joint Boot kit. Meyle's CV Joint Kit focuses on various German-made cars from 1987-present. If you've got a classic German car, Febi's replacement CV joint boot kit provides good product coverage. A popular product for Volkswagens made in the 1950s-70s is the Beck Arnley CV Joint Boot Kit.
Vaico CV boot kits provide good coverage for Mercedes models from 1986-on along with later BMWs, VWs, and Audis. For a wide range of newer vehicles in addition to popular American and Euro classics, we've got the CV Joint boot kit by EMPI, along with Moog CV Joint Boot Kits and Rein CV Joint Boot Kits designed for BMWs back to 1969. And if you can’t locate boots for your specific vehicle, we’ve got the universal-fit CV Boot by RCV Performance.
Heavy-Duty CV Joint Protection
Many of our staffers at CARiD are off-road enthusiasts, and we understand the call of the trails. Consequentially, we know how unforgiving rocks, fallen branches, and other hazards can be – especially to CV axle boots that are in extremely vulnerable positions. Whether you travel over rough terrain by choice or by necessity, you need replacements that offer a higher level of protection. We've got a number of choices.

The main difference is the material. Enhanced neoprene or silicone-based compounds may be used, which are much more difficult to puncture than rubber. Also, such boots feature higher resistance to rotting. Many of them are offered by Dorman, RCV Performance, and Megan Racing.
We've also got CV axle boots made of hearty polyurethane – another material that's extremely durable in off-road situations. There's the RCV Performance Spherical Sealing Technology CV Joint Seal suitable for full-size American trucks or Jeeps.
How to Replace an Outer CV Boot
Since outer CV boots need replacing far more often than inner ones, we'll look at the process of replacing an outer CV boot. Once the wheel is removed and the axle shaft is freed from its anchor points, sliding the old one off and the new one on is relatively simple. Below, we'll start from the point where lug nuts/bolts have been loosened.

Step 1: Remove the Axle Nut from the Center of the Wheel
With a socket, or with the help of an air tool, loosenthe axle nut located in the center of the wheel. In many cases, it's possible to do thatwith the wheels on the ground. If the wheel is already removed, the nut can get loose if you block the brake rotor against the caliper, with a screwdriver or a similar tool. Anyway, the nut and wheel should be removed from the vehicle. As for the caliper, it can be simply moved aside, without disconnecting the brake hose; just unscrew one or two bolts that keep the caliper in place.
Step 2: Disconnect the Steering Tie Rod
Underneath the steering tie rod linkage connection, you'll see a threaded stud with a cotter pin in it. Use a pair of needle nose pliers to grab and remove the cotter pin. Once the pin is out, you can loosen and remove the nut.

Next, you'll need to whack the end of the threaded stud to break it loose and remove it. In order to prevent damage to the stud or the threads on it, use a heavy plastic mallet instead of a metal hammer (in some applications, you can use a pickle fork). If you don't have a plastic mallet, use a piece of wood to cushion the impact between the hammer and the ball joint stud.
Step 3: Remove the Sway Bar Link Rod

To ensure you are able to push the lower control arm all the way down (in a future step), temporarily disconnect and remove the sway bar link rod that connects thesway bar to the lower control arm. These link rods use standard bolts on both ends, so the removal should be relatively straightforward.
Step 4: Disconnect the Lower Control Arm
To free the ball joint at the end of the lower control arm so it can be disconnected, you'll need to loosen a long, horizontally-positioned bolt and slide it out. Tap downward on the lower control arm with a hammer in order to break the pin at the end free from the steering knuckle that the wheel and brake components mount to. The pin should slide down and out.
Step 5: Disconnect the Steering Knuckle From the Axle

Once you've removed the pin in the previous step, the steering knuckle can be moved around enough so that the axle can be pulled loose from the splined hole in the knuckle.
Step 6: Remove Old Ring Clips / Bands
Loosen the old metal bands with a screwdriver or pliers, then slide them off.

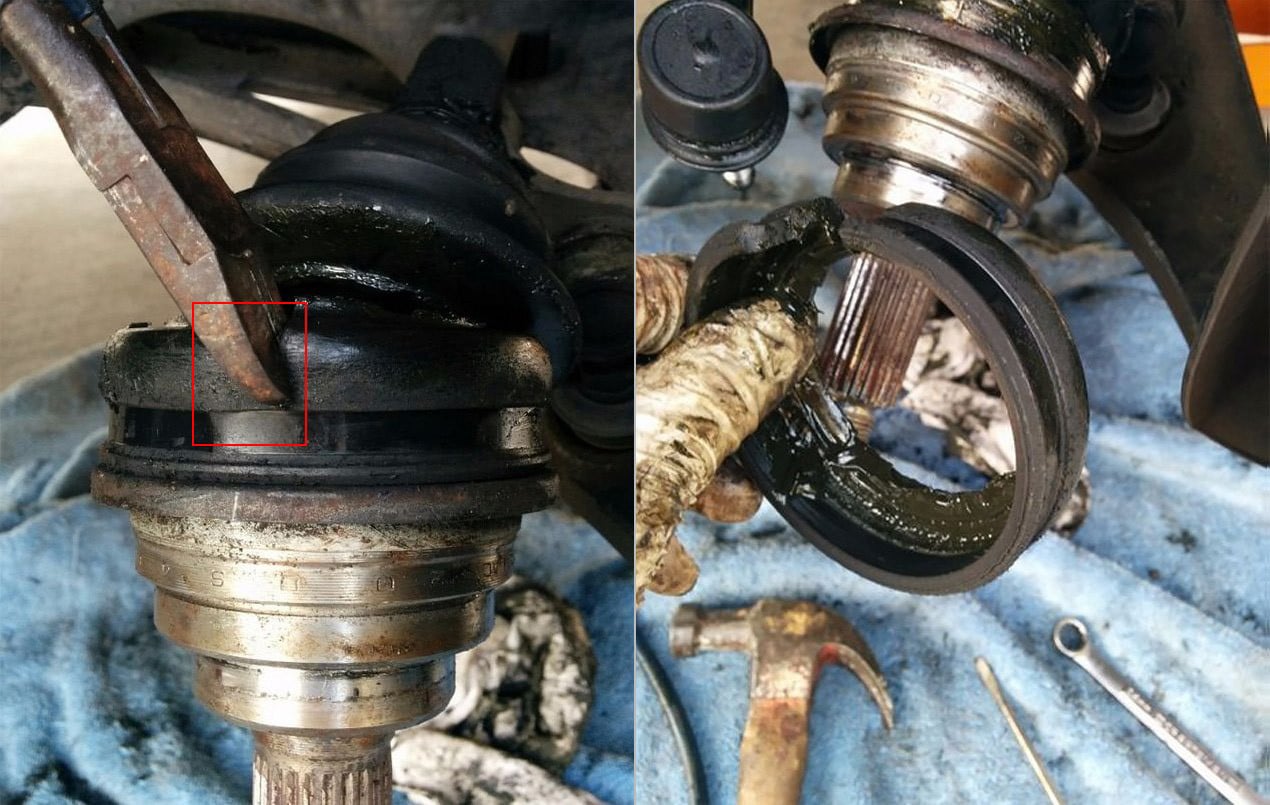
Step 7: Remove the Old CV Boot
Using a pair of channel locks or a razor blade, cut the old boot away and remove it from the axle shaft. Wipe as much of the old grease away as possible with a rag, then spray cleaning solvent to thoroughly remove any gunk that remains.
Step 8: Install Your New CV Boot
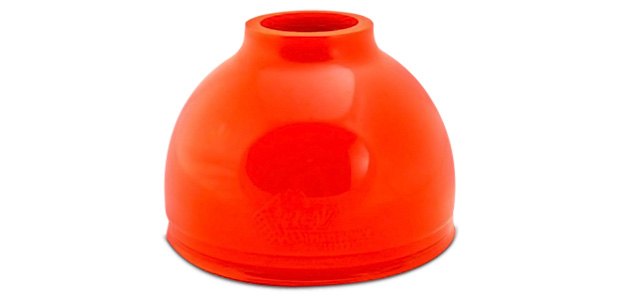
There are several ways to do that, depending on your vehicle's design and the need to take the CV joint off for cleaning and inspection. A simple method allowing you to avoid splitting or removing the joint when installing the boot is the use of a special plastic funnel. First, take your new CV boot and flip it inside out. Next, take the funnel, coat the outside of it with grease, then insert the wide end of it over the axle CV joint. Most kits come with a tube of axle grease, so go ahead and use that.

Take the inside-out CV boot and slide it (wide end first) up over the lubricated funnel until it completely passes over the funnel. Correct the inside-out, inverted orientation by grabbing the wide end of the boot and flipping it over as you pull it back toward you. Once that's done, it will be positioned correctly for installation. Pack fresh axle grease into the CV joint.
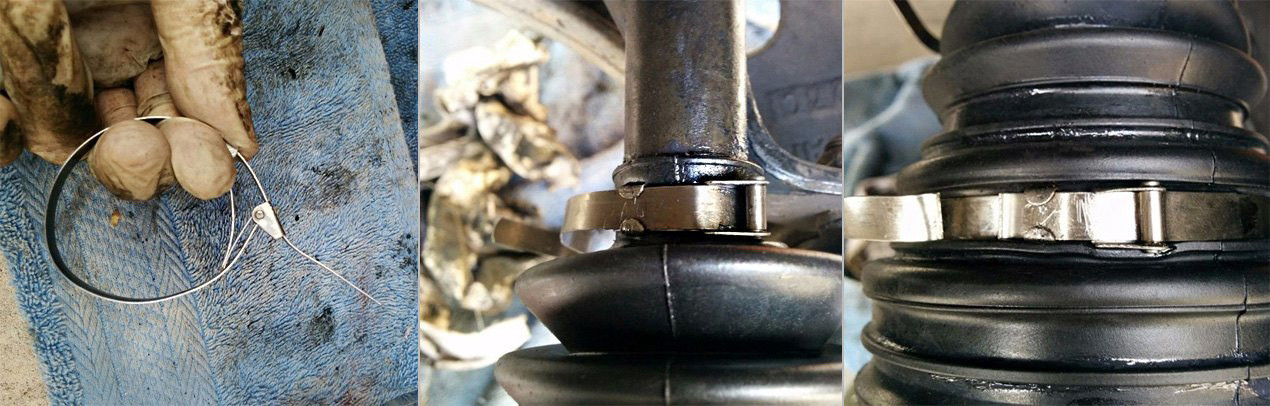
Step 9: Install New Ring Clips / Bands
You'll be installing two bands on your new CV axle boot - one on the larger outboard side, and one on the smaller inboard side. After positioning each band in place, pull the banding tight. Create a bend by pulling the extra banding back the opposite way. With a pair of pliers, bend the retaining tabs over this extra banding and cut off the excess that's left over.
Step 10: Cut Away Any Extra CV Boot Material
Using a razor blade, box cutter, or any cutting tool, neatly trim off the excess CV boot material. If a vehicle-specific boot is used, this step is not needed, as the part is of the right length.
Step 11: Reinstall All Components
Reinstall all steering andsuspension components in the reverse order you disassembled them, until the wheel is bolted securely onto the vehicle.
IMPORTANT: look up the torque specs for the fittings on your vehicle, and use a torque wrench to tighten all nuts and bolts to the correct torque.
We recommend taking a short test drive, then re-inspecting the new boot to make sure it's still tight without leaks of any kind.
Common Recommendations

CV boot kits are an efficient, cost-effective way to repair an axle with a damaged boot. As a best practice, inspect your CV boots regularly (at a minimum, every oil change, and more frequently if you drive off-road). Even if you notice small cracks in the rubber, don't wait too long to make the repair, as such a boot will likely tear soon. By replacing it now, you can be sure that no dirt makes its way in. The goal is to capture and repair any boot damage BEFORE it extends to the CV joint itself!