
Typically, you're not at home, you're on the side of the road.
There is never a good time for your vehicle to get a flat tire; but some moments are worse than others. In an ideal scenario, you will find yourself with no other traffic in sight, on a wide paved road, on a sunny warm afternoon. Change any (or several) of those parameters though, and getting out to change the tire becomes a perilous situation.
In providing instructions for replacing a flat, we are presuming that you are indeed on the road somewhere, and not at home. Of course, doing this in the luxury of your driveway offers many advantages, but you can still make use of the steps as outlined below.
Move safely away from danger.
The highest priority is your own safety. No matter how much traffic surrounds you, drive the car slowly and as far off the road as possible, while remaining on a paved surface. A wide shoulder or store parking lot would be ideal.

Driving on a flat tire is going to inflict some damage to the wheel. The further and faster you drive, the more likely that the wheel will be harmed. Aim for the best compromise - drive as slowly as traffic will allow without putting yourself in more danger, and drive the shortest distance to a paved, flat area. In a worst-case scenario, a ruined wheel is better than risking life and limb in an attempt to save the wheel.
Put it in P, turn it off, apply the e-brake and turn on the flashers.
Once you're stopped, put the vehicle transmission in Park, turn off the ignition, apply the parking brake, and turn on the 4-way flashers. From this point onward, your ability to successfully change the tire is dependent on having the proper tools and supplies on board. If you do not, your only option is to call for roadside assistance.

The vehicle needs to be on fairly level pavement.
The level paved ground is important for vehicle stability. You cannot expect to jack up the car in a safe and secure way if it's at an angle, or if the base of the jack is on gravel, dirt, or sand. Should you be fortunate enough to have one handy, a wooden board, like a 2x6 or a piece of thick plywood, could serve as a base under the jack.
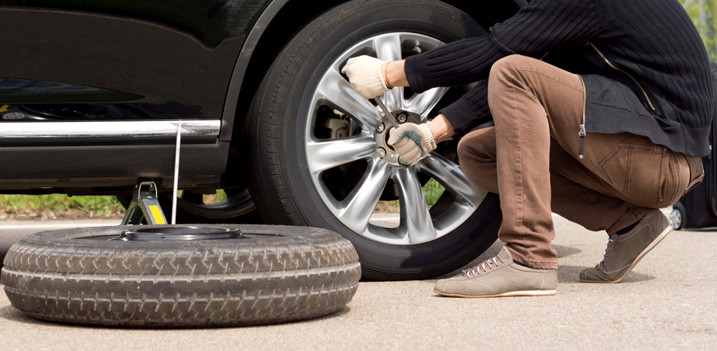
Remove the spare and the tire-changing tools.
If you're in dress clothes, remove as much of the nice clothing as you can; if you have a work shirt, jacket, or poncho in the vehicle, put it on. A pair of nitrile or latex gloves take up almost no room in the glove box; use them if you have them.

Proceed to off-load the spare tire, jack, and lug wrench. If you have a tire pressure gauge, check the pressure in the spare. Hopefully it's got air in it, and if it does, proceed. If it does not, call roadside assistance, because you can't replace a flat with a flat.
Review the owner's manual.
It's more than likely that you have not used the factory-supplied jack in a while, if at all. Take the several minutes you'll need to read the owner's manual about proper jack usage. The time will be well spent.
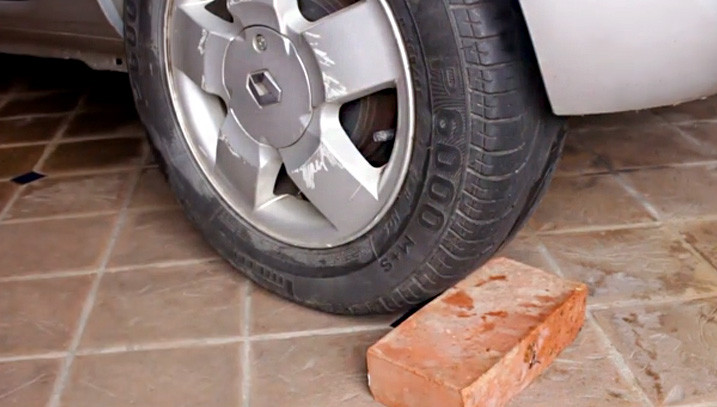
Chock with a rock, or anything handy nearby.
Even on perfectly level ground, a vehicle which is raised at one end runs the risk of rolling off the jack. Minimize that risk by chocking at least one wheel on the axle opposite the flat. Use a rock, toolbox, large tree branch, or anything else available that's nearby, and place it up against the tire tread.
Loosen the lugs before jacking it up.
Pop off the hub cap/wheel cover (use the other end of the lug wrench which is usually made for this purpose), and, while the vehicle is still on the ground, loosen each /bolt about one turn. Do not remove them yet. If you raise the tire first, you will not be able to break the lug nuts/bolts loose.

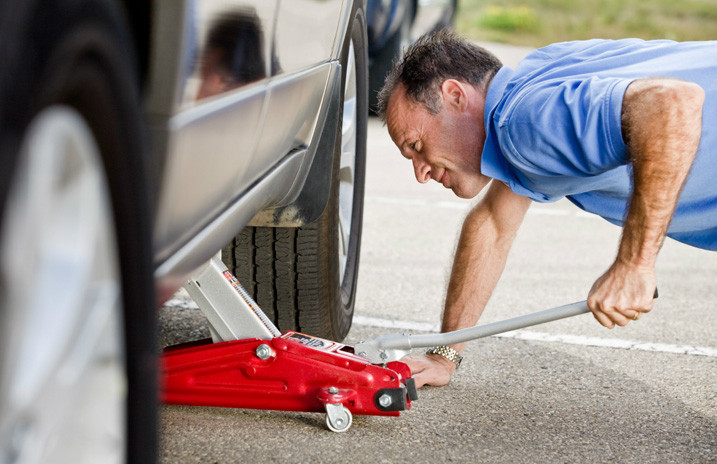
Raise the tire only as much as you need to.
Place the jack in the recommended position under the car. On many modern cars, that location is at the pinch weld under the rocker panel. Crank the jack handle and start the lifting. Once you see the body of the car start to rise, stop. Give the car a little push to make sure everything is steady. If it's not, it's better that it falls off the jack at this early juncture rather than later. Continue jacking up the car until the flat tire is clearly off the ground. You do not need to raise the car as high as the jack will allow. That only increases the likelihood of the vehicle falling off the jack.

Don't get under the car!
There is no reason during this effort to put your body under the car, so don't. Work slowly and steadily. If for any reason the vehicle seems unsteady to you, stop, lower the jack (putting the wheel back on if necessary) and start again. Sometimes you'll find that you need to reposition the jack to make it sturdier.
Remove the flat, install the spare.
Continue removing the lug nuts or bolts. Put them somewhere out of the way so that you don't kick and scatter them. Take off the flat, lay it on the ground for now, and put the spare on in its place. Start one lug nut/bolt to hold it on, then start hand-threading all the others. Do NOT use the lug wrench to start them, as you run the risk of cross-threading the nuts/bolts if you do.
Snug everything down.

Tighten the nuts/bolts in a crisscross fashion. Tighten them gradually until they 'bottom out'. Then try to tighten them a little more (the tire will spin on the hub while you're doing this, which is normal). With the understanding that the tire will turn, you want the lug nuts/bolts to be as tight as possible before you put the weight of the car back on the tire.
Lower the jack.
Turn the jack handle so that the body of the car begins to drop. Move slowly; there is no need to rush this. Continue until the car is down on the ground, then continue to wind the jack down until it is fully collapsed. Remove the jack from the car. (If you're in a busy spot, there may be pressure to complete these tasks as quickly as possible. Still, work methodically. Move equipment back toward the trunk so that you don't leave something under the vehicle as you drive away.)
Perform a final tightening of the lug nuts/bolts.
You must go back and continue to tighten the lug nuts/bolts. Without a torque wrench, it is difficult to describe how tight they should be. For people of average strength, turn the lug wrench for an additional 1/4 to 1/2 a turn after the lug nut/bolt bottoms out. On some cars, you may not be able to turn it that much. There is no need to step on the lug wrench and use your entire body weight as leverage. If arm exertion cannot turn the fitting any further, chances are it's tight enough. If you're stronger than average, you do not need to tighten things 'with all your might'; you run the risk of damaging the threads.
If possible, let a repair shop check pressure and tightness.
Depending on where you are and what time it is, this extra step may buy some peace of mind. If you are confident that the spare has the correct pressure, and that you tightened the lug nuts/bolts correctly, then finding a repair place to check your work is not necessary.
Repair/replace the damaged tire ASAP.
The temporary spares in most modern cars are not designed for long-term use, so once you're back home (or as soon as you can), bring the flat to a repair shop. If it's fixable, they will patch it and refill it. If it's damaged beyond repair, you will be on the hook for a new tire. (And ask them to double check the wheel for possible damage.) Try to buy the exact same brand, model, and size.
If the other tires are more than half-worn, we strongly suggest soliciting the opinion of the tire shop to see if you should be purchasing a pair of tires for one axle. (Some AWD vehicles demand that tires be of equal wear at all four corners to avoid drivetrain damage.) It can be short-sighted to replace only one tire if the others are close to the end of their useful life. We want you to be safe out there!