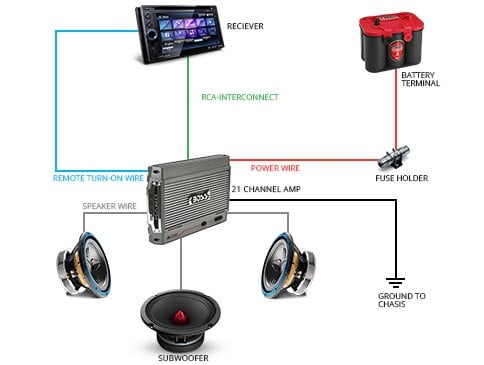
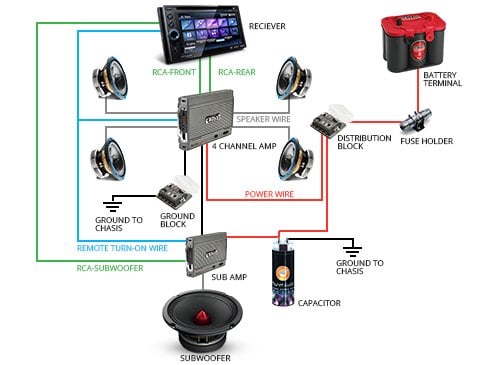
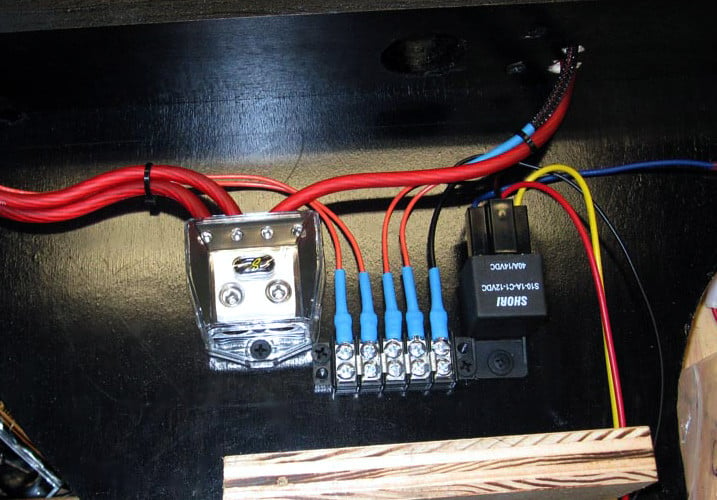
In this article, we'll discuss the basics of your vehicle's audio system wiring. Specifically, we'll look at the addition of one or two amplifiers to your system, and examine the steps involved for both the mechanical and electrical installation. Refer back to these two illustrations while reviewing the text.
Tools Needed:
- Slotted and Philips Screwdrivers
- Utility knife
- Electric drill and Drill Bits
- Soldering iron and solder
- Wire and Cable Hand Tools
- Ratchet and Sockets
- Pliers
- Heat gun
- Heat shrink tubing
- Electrical Tape
Step #1 Is Very Important!
Every car audio installer, indeed, every automotive professional, will always recommend this first step: disconnect the battery by removing the negative battery cable. You want to do this in order to avoid any possibility of a short circuit. Remember that on many late-model vehicles, you will need a "radio code" in order to reactivate the radio.
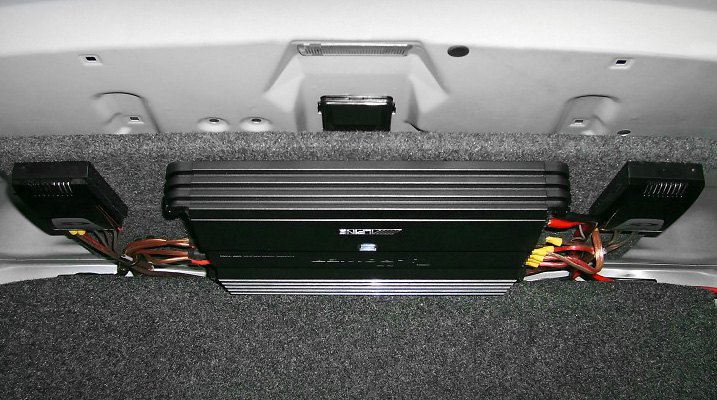
Amplifier Location
Presuming that your car or truck has an existing stereo sound system and that you are interested in installing one or two amplifiers as an upgrade, the next step will be to decide the mounting location for the amp. Mount an amplifier less than three feet from the car's radio or bolt it directly to the vehicle's metal chassis, and you'll hear a lot of annoying static, buzzing, and humming over your music. Distancing the amp from the head unit, using rubber mounting grommets, and/or mounting it to something other than the chassis will help eliminate this kind of unwanted noise.
Amplifiers have slotted cooling fins on their surface to release internal heat that builds up. (Power amps can get quite hot to the touch.) When you select a location, make sure the cooling fins have plenty of space around them to dissipate heat which will radiate upward. The fins should face the sides or top of the amp. Mounting an amplifier upside down is a no-no, because the cooling fins will be on the bottom and dissipated heat will radiate back up inside the amplifier unit where it can't escape.
You will also want to leave enough room around the sides of the amp to connect wiring and make adjustments for boost, crossover, and other factors. Typical amplifier mounting locations include under the passenger side dash, under a seat, or in the trunk or hatch area. There are pro's and con's to each choice. Under the dash or seat keeps the wiring to the receiver shorter, but can be awkward to install. The seat may need to be temporarily removed. The trunk/hatch area is easily accessed, but wires then need to be routed the length of the vehicle. Cargo capacity can be compromised.
Grounding The Amplifier
According to experts, loose or poor ground wiring is a leading cause of stereo sound system problems and underperformance. (Interestingly, it's also the #1 cause of any electrical issue on a vehicle.) All amplifiers require a separate ground wire, so it is important to find an ideal spot to make that connection. One easy choice is an existing ground point. Look for a wire or cable already connected to a bolt that screws into the body or chassis.

If you decide to create a new ground point, you will need to drill a hole (NOTE! Check that you have clearance on the other side), and scrape away any paint, undercoating, etc. which may prevent good metal –to-metal contact. An appropriately-sized sheet metal screw and star washer will maximize the quality of the ground connection.
Wiring Placement
With the amplifier location decided, you must now plan the running of wires from it to the battery, head unit, and speakers.
If the new amp is installed in the trunk, you will need to plan a way to route the wiring from rear to front while keeping it hidden and protected. Some partial disassembly will be required to place the wires under carpeting. Consider routing the wiring where access is easily gained, such as under door sill plates, kick panels, pillar post trim panels, and removable rear seat cushions. Usually, these components can be unscrewed or pried loose from the edges rather easily.
Your amp will draw power directly from the vehicle's positive battery terminal, so there will also be the need to run a power cable through the vehicle's firewall. Most vehicles will already have such a hole drilled as a pass-through for other cables, so locate this hole and run your wiring through it. Your amp should come with a power cable that's approximately 15 to 19 feet long. From the battery in the engine compartment, you will be running this wire through the firewall and underneath panels described in the previous paragraph until it reaches the amp.
Fuse Holder
Your installation package will come with a fuse holder. It may already be integrated into your power cable, but if it isn't then you'll need to install it yourself. The industry standard is that the fuse should be no further than 18" from the battery; less than 12" away is preferable. Cut a 12-18" long section of power wire, attach it to one end of the fuse holder, and attach the other end of the cable to the other fuse holder end. Use appropriate wire stripping and crimping tools to connect terminals, or solder them and cover with heat shrink tubing or electrical tape.
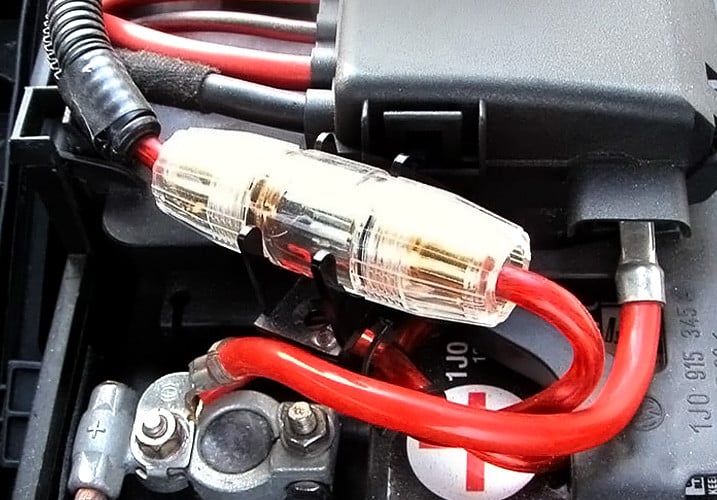
The connection at the battery positive cable is typically made with a ring terminal. NOTE! Attach this ring terminal to an auxiliary stud, or to the bolt/nut which secures the positive terminal. Do NOT attach it to the battery post itself.
Connect The Amplifier "Turn-On Wire"
The next step is pulling the radio out (see our related article on Car Audio Installation 101) and locating the "amplifier turn-on wire" leading from it – typically, it's blue in color.
Your amplifier will have a lead designed to mate with this wire, and they can be crimped or soldered together based on your own preference. Once they're connected, the turn-on wire will automatically cue the amp to power up once the radio is turned on. (Reference the two illustrations at the beginning of this article to see the blue turn-on wire.)
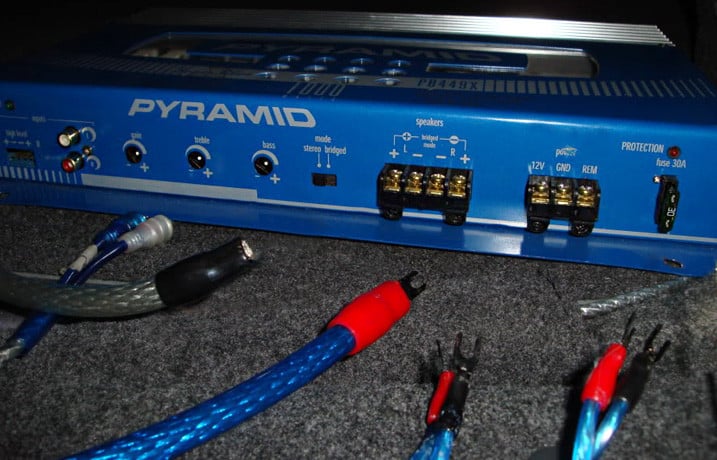
Connecting The Wires That Transmit Signals To The Amp
Now it's time to install wires that transmit the signal to your amp. Some stereo receivers may be equipped with RCA type jacks and some may not, but the most important thing to remember is that signal wires and power cords for amps should always be run on opposite sides of the vehicle to prevent electrical noise and static.

However, if your radio does not have RCA outputs, it's possible to cut factory speaker wiring and use it as an input source to your amplifier. You'll need a line output converter that converts high level speaker line outputs from an audio source into low-level RCA jacks on your amp. Cut the factory wiring at the speakers or behind the radio, then plug those wires from the radio into the line output converter.
Connecting Speakers To The Amplifier
The final step before testing and enjoying your new amp is running new speaker wires from amplifier output jacks to each speaker. 16-gauge is a good thickness to use for speakers, and 14- or 12-gauge works well for subwoofers. Make sure wiring from positive and negative terminals on the amp leads to corresponding positive and negative terminals on the speakers to ensure proper sound quality.
Unlike input from the radio itself, signals running to speakers won't pick up electrical static if wiring is placed near power cables. Run wiring to door speakers through a rubber boot leading to the inside of the door panel – usually this boot is located near one of the door hinges.
If you've got a system that's less than 75 watts of output, it's also possible to run all the speaker wires from the amp to the wiring harness in the dash behind your stereo. This way, you'll be using all the factory speaker wires to get the sound to the speakers. Cut each speaker wire leading out of the harness and reconnect them to the ones from the amplifier.
Installation Of A 2nd Amplifier
Look at the wiring schematic at the top of this article; installation of a second amplifier is not that much more involved than a single amp. Use of distribution blocks and ground blocks for power and ground connections help minimize the need to "double up" the wiring. You will need both a subwoofer signal wire and an additional turn-on wire from the receiver. The turn-on wire can be a spliced connection from the existing one. The only truly unique item for the subwoofer amp is the capacitor. Briefly, a capacitor is a device which is capable of storing electricity. Because the sub amp requires consistent voltage to generate its power, any fluctuation in that voltage can result in a temporary loss of power or sound. The capacitor "evens out" any voltage drops, delivering voltage to the subwoofer to keep it operating at its optimum level.
Power Things Up
After double-checking all connections, re-install the vehicle's negative battery cable to restore power. Once everything on your new system is working to your satisfaction, bolt the radio back in place fully and put all loose cover panels back on. Enjoy your new, more powerful automotive audio system!