
In the custom hoods section of our website, you'll find add-on hood air scoops that create an unmistakable look of power. Since the beginning of hot-rodding, racers have been fitting scoops onto their cars both for looks and function. Over the years, many high-performance muscle cars have even featured them as original equipment on top trim levels.
Hood scoop openings can face forward in order to guide cool air into the engine, or the openings can face rearward to take advantage of the high-pressure area at the base of the windshield. Whichever way they are positioned, airflow under the hood increases - a factor that improves both induction and heat ventilation to varying degrees.


We've got both functional and non-functional hood scoops. Functional scoops are open along their bottom side, with the express purpose of guiding outside air through a hole (or holes) in the hood where it will blast directly onto the air intake assembly and into the engine. These are desirable for those looking to enhance power output, or even mileage.
Non-functional scoops are just for looks, and may not have openings on their underside. These are a better choice for those who wish to add visual excitement without defacing a valuable classic or altering the stock hood of a newer performance car and hampering resale value. Naturally, functional hood scoops can also be used just for show if you choose not to cut your hood.
Most often, functional scoops bolt in place on the hood using screws while non-functional scoops use sturdy, double-sided adhesive tape. However, exceptions to that rule are often found which work just fine. In this article, we'll guide you through the steps of creating a cutout on your hood panel, show you how to mount a bolt-on or stick-on scoop, and review the products we offer.
NOTE: These installation instructions presume some working knowledge and experience with automobiles. Extreme care must be used, especially when working with power tools, to avoid property damage or personal injury.
NOTE: These instructions are general in nature. In the event that a hood scoop manufacturer provides specific instructions, that information supersedes these directions.
Tools Needed:
- Tape Measure
- Primer Paint
- Masking Tape
- Sealant for Gaps
- Hood Cutting Tools
- Drill
- Drill Bits
Installing A Bolt-On Scoop With Functional Hole In Hood
Step 1


NOTE: Although not mandatory, these installation steps are easier if the hood is removed from the vehicle. If left in place, take care to avoid damage to engine compartment components.
Using a measuring tape, find the exact center of the hood and mark it using masking tape. Do this in several spots from front to rear so you can get a visual of where the centerline is down the hood. After determining that, position your scoop in a centered position and use masking tape or a soft marker (one that won't leave a permanent mark) to denote the outer edges of the scoop.
Step 2
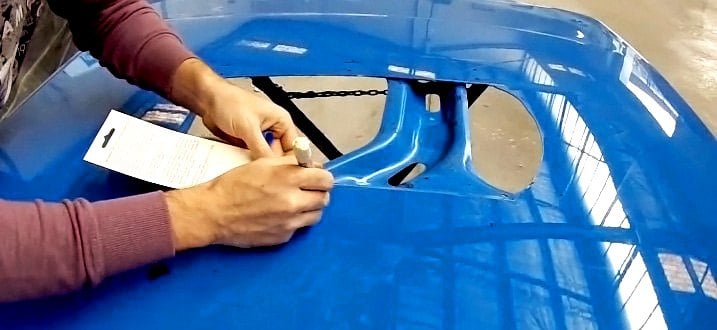
Now that you've marked the outside perimeter of the hood scoop, flip it over and observe where any hold-down screws are located, if you've got a bolt-on type scoop. The hole you cut in your hood cannot be as large as the scoop itself, because then the screws would have nothing to anchor into. Measure how far in the screws are from the edges of the scoop, and write this measurement down. The easiest way to record the location of the mounting holes is to create a template: using a piece of cardboard slightly larger than the scoop, draw the scoop's outline on the board.

Next, temporarily install the hold-down bolts, dab them with wet ink, or crayon, or even paint, and position the scoop exactly within the outline. Lift off the scoop; the marks left by the bolts are the locations of the holes you will need to drill later.
Step 3
Take the measurement you calculated from step 2 and then add at least 1/2" to that measurement. If your scoop uses tape instead of screws, add an inch of leeway on all sides instead - that way there will be sufficient surface for the adhesive to stick to.


Mark off an inner section on your hood which is that much further in from the outer perimeter marks on the hood. Once you've got "inner" lines drawn, put down masking tape around them so your eye will have a clear path to follow when cutting. The smaller diameter opening is where you'll be cutting into the hood.
Step 4


Drill a small hole at each corner, then use a boring bit to enlarge the holes. These will serve as easy starting points for a jigsaw or cutting wheel. We recommend using a jig saw only if there are no cross-frame support members underneath where you'll be cutting. If there are, a cutting wheel will get through the surface without protruding as far down.
NOTE: If performing Steps 4 & 5 with the hood on the vehicle, ensure that you do not drill down and into any engine compartment components. Also, use sheeting to protect the engine from metal shavings.
Step 5


Using your tool of choice, cut your hole in the hood. It doesn't need to be perfect because the cut lines will be hidden underneath the scoop once it's permanently installed. Once the panel is removed, pull up any tape so you can see marks you left showing where the scoop is to be positioned.
Step 6

If you're using a stick-on scoop, skip to the set of instructions further below titled "Hood Scoops That Use Adhesive Tape". If your scoop bolts in place, use the template you created in Step 2, laying it exactly within the outline on the hood. Mark the holes' locations, and remove the scoop for now.
Step 7
Double check all your measurements, as you will be drilling the mounting holes next. The marks for the holes should be centered, front-to-back and side-to-side of the HOOD, not the opening! If your opening is slightly less than centered, no worries, as the scoop will cover it. BUT if the opening is ever-so-slightly askew and you mark the mounting holes in relation to the opening, the finished product will not be centered.
Step 8


Drill the holes as determined in Step 7, then use a small paintbrush to touch up any newly exposed metal areas with primer to prevent corrosion.
Step 9


For bolt-on scoops, flip the scoop over and coat the flat edges with silicone-based adhesive to eliminate any gaps. Using a flat edge, smooth down the adhesive so it covers most of the mating surface evenly.
Step 10
Lower the scoop onto the hood and line it up the best you can by eye.
Step 11

Insert screws that came with the scoop and tighten them from underneath the hood. Be sure not to over tighten, as this can cause ripples in the sheet metal.
Step 12

If you notice that any significant gaps still exist along any of the seams, we recommend filling them with seam sealer. Once it's dried, you can apply touch up paint to make the fill less visible.
Step 13

Once you're satisfied the scoop has been positioned and sealed properly, use tape to hold the scoop in place for a few hours so that adhesives and sealants can fully cure.
Installing A Hood Scoop With Adhesive Tape
Whether you've cut a hole in your vehicle's hood or not, installing hood scoops that use adhesive tape is relatively easy, because the tape comes with a protective backing that's peeled away just before final installation. Such scoops we sell use tape made by 3M™, and its foam middle section allows lots of flexibility during temperature changes - especially over irregular surfaces. In some cases, your scoop will arrive with the tape already applied to it - so you'll only need to peel and stick the side that goes against the hood.
Step 1

Start by cleaning the painted part of the hood where the adhesive tape will be applied using carwash soap and water. Next, use paint prep (Prep Sol or Prep All are popular brands) to remove all traces of wax, oil, etc. (Your hood scoop may come with a small amount of "surface preparation" alcohol solution.) This must be done to ensure that the tape adheres properly.
Step 2

Using a measuring tape, find the exact center of the hood and mark it using masking tape. Do this in several spots from front to rear so you can get a visual of where the centerline is down the hood.
Step 3

Place the scoop where you'd like it to be mounted, making sure there's equal distance on the sides, and between the front and rear edges. Once you've determined the optimum position, mark along the edges with masking tape for future reference in later steps.
Step 4

Peel several inches of the backing strip away from the tape at all four corners of the scoop. (For some hood scoops, you may need to first install the tape to the scoop by peeling away the protective strip on ONE side of the tape, and sticking it to the scoop all along its perimeter.)
Step 5

With the tape peeled at the ends, position the scoop on the hood using the masking tape marks as a guide. Gently press on the ends so the peeled adhesive keeps the scoop in place (make sure the ends of the backing strips stick out visibly, because you'll need to grab on to them in order to pull the tape all the way off). Adjust the position of the scoop until you're satisfied.
Step 6

Once the scoop has been lined up, grab onto the backing strip ends and pull until they've been completely removed. As you peel, apply pressure along the way.
Step 7

When all the backing has been removed, rub your hand back and forth over the scoop in order to continue applying pressure to all areas a little longer. Once bonding is complete, test for proper adherence by attempting to wiggle the scoop. It should not flex. Follow any guidelines the manufacturer specifies about not washing the vehicle for a period of time after installation.
Step 8

If you've got a separate mesh piece for the air opening that must be installed, remove any adhesive backing strip for that and press the mesh piece into place so that it may bond.
Hood Scoops We Offer
If a non-functional scoop is what you prefer, we've got the urethane 3D Carbon Hood Scoop that's offered in a more conservative rectangular shape with an opening at the front. Depending on make and model application, you can choose standard size or "Shaker" style that's a little wider. This scoop offers the unique option of being pre-painted to match any color paint code you supply.
Note that when 3D Carbon paints the scoop for you, the color, brightness, and hue will resemble how your vehicle's paint looked when it was brand new. So if it has faded over time, you may want to have a body shop match it to your vehicle. If you do opt to order it pre-painted, you'll be asked for the paint code after you add the product to your "shopping cart".

When it comes to hood scoops that are open at the bottom and can be used to functionally direct airflow into the engine, we've got a choice of styles and materials. For best value, AVS plastic Hood Scoops come in black, unpainted form and feature a subtle rectangular front opening. For a slightly different look, Jeep Wrangler owners can choose the Rampage Air Intake Scoop that’s available in tinted smoke plastic or with a chrome finish.

There's also the relatively conservative Street Scene Hood Scoop for full-size Ford trucks and GM trucks dating back to 1988 - available in urethane or fiberglass depending on model year. The Duraflex Type 1 Ram Air Style Fiberglass Hood Scoop comes with black primer already applied. The VIS Racing Hood Scoop features fiberglass construction for select import performance cars.
Carbon Fiber Hood Scoops

For those performance buffs looking for a real carbon fiber hood scoop that's ready to install out of the box, we've got a selection to choose from. In addition, we also feature imitation carbon fiber scoops that give you the performance look of the real thing at a lower price. If there’s any confusion whether a specific scoop is or isn’t real carbon fiber, that detail will be noted within the product page in description and/or Features fields.
For example, the Seibon Carbon Fiber Hood Scoop is crafted from a single sheet of carbon fiber, then coated with a durable layer of clear coat. It's available for late-model import performance cars such as the Mazda 3, Subaru Impreza/WRX, Mitsubishi Evo, Toyota Celica, and Mini Cooper. Designs may vary depending on vehicle application, but they're all stylish without being over the top. For Subaru Impreza/WRX models, we’ve also got the AIT Racing Carbon Fiber Hood Scoop.

And if you really want a scoop that gets noticed, the K&N NHRA Stock Carbon Fiber Composite Hood Scoop offers universal-fit dimensions in heights of 10 to 12 inches. In the Product Options field, a cover plug piece is available for the air opening.
Larger Hood Scoops That Make A Big Statement
Perhaps you're looking to make a larger, more powerful statement with your add-on hood scoop. If so, we've got a selection of universal fit scoops from Duraflex in big sizes - with aggressive looks. Beginning with the "smallest" 41-inch-long configuration, there's the Spyder 2 Style Fiberglass Hood Scoop and the Type 4 Style Fiberglass Hood Scoop.

Moving up in length, there's the 44-inch Super Sport Style Fiberglass Hood Scoop that tapers to a narrow point at the front, and the 45-inch Vortex Style Fiberglass Hood Scoop with two openings positioned low on the scoop. And for bigger cars or trucks with longer hoods, there's the Duraflex 54-inch Spyder Style Fiberglass Hood Scoop with two aggressive-looking openings at the very front of the scoop. If you prefer a single opening with rakish contours, take a look at the 51-inch Spyder 3 Style Fiberglass Hood Scoop.

As always, we recommend taking your time and researching all the hood scoop options available to you. The two big decisions will be whether to cut an opening in the hood or not; and whether to seek a vehicle-specific product versus a universal one. As we stated at the beginning of our article, installation may be something you can tackle yourself, or you may need to factor in the labor of a professional. But keep your eye on the end result: a new hood scoop will completely change the impression you present as you cruise on down the road!