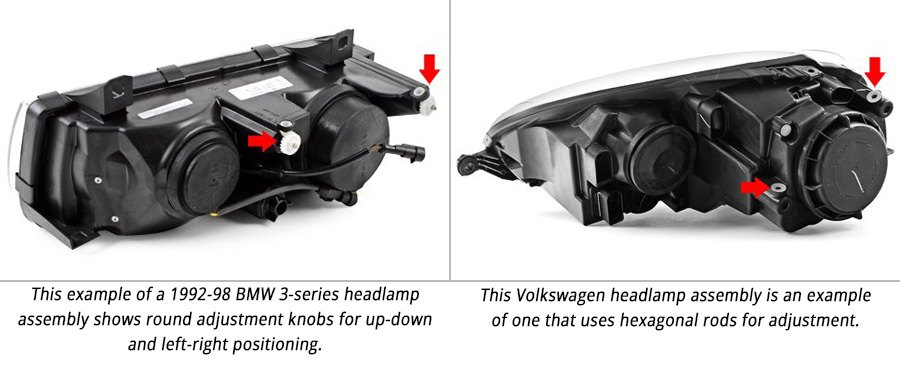
- Adjustment
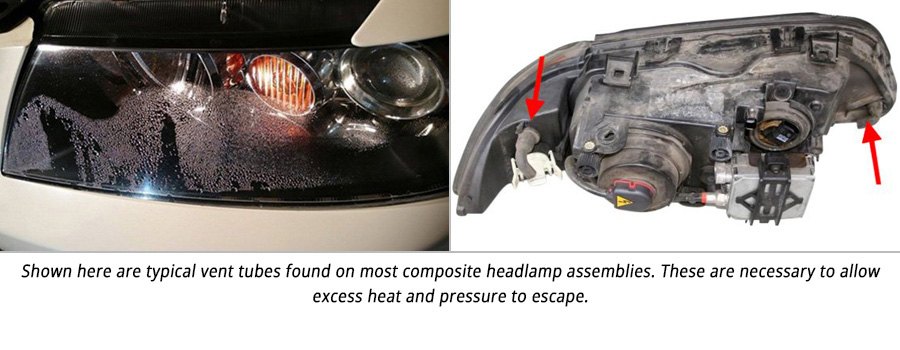
- Condensation
Adjusting Aim Of Headlights Once Installed
Tools Needed: Tape measure, masking tape
Knobs, screws, and fittings on the back of headlamp assemblies that adjust headlight aim vertically and horizontally can vary greatly from design to design. Once you have the tools you need to rotate the specific adjustment knobs on your headlamp assembly in hand, grab a roll of masking tape and a 25-foot tape measure as well. We'll help you aim your new headlights without any complex or technical equipment.

To do so, find a white wall and a level surface to park on - you can do this inside or outside, but the ground must be level and the wall flat and vertical. Measuring carefully, mark exactly 3.5 feet up from the bottom of the wall. Make two marks, and run a piece of masking tape horizontally across the two marks. The tape should be as wide as the vehicle plus an extra 2 feet per side.
Park the car so it's exactly 25 feet from the wall to the face of the headlamps—don't estimate. Begin to adjust the low beam using the adjusters on the back of the headlight assembly so the beam shines 3.5 feet high on the wall.

We leave you with these words of wisdom: while we consider the installation of a set of custom headlamp assemblies a "DIY" affair, this kind of work is not for everyone. If you have had experience working on your own car, you will likely be comfortable performing this task on your own. If you are new to the hobby and want to give this a try, please use this article as a guide. You may also want to search out additional information on the Internet. If for any reason you are uncomfortable tackling this, please enlist the help of a professional. Whichever path you choose, have fun with the project, and enjoy the new custom lights on your ride!
Should I Be Concerned About Condensation Inside My Headlight Assembly?
The quick answer to this questions is no. Condensation buildup inside a headlight assembly is normal, and it occurs for a number of reasons. First, vents along the top and bottom of the headlight housing are necessary to equalize pressure differences that would otherwise cause the entire assembly to crack and fail. Hot headlight bulbs create high pressures inside the headlamp assembly, and temperature differences only increase as lens cover surfaces cool from direct airflow contact at speed.
Condensation does not mean that a headlight assembly is defective, and the presence of fogging or misting due to condensation is not considered a valid reason for warranty replacement of the entire headlamp assembly.

After hot, pressurized air has worked its way out of the headlight through the vents, humidity can get drawn in from the outside. So, headlights that have been on during hours of driving become fogged on the inside because their cool temperature creates a low-pressure area that actually draws moisture in. This condition is made worse by high outside humidity, and by colder outside temperatures during winter months.
Condensation inside the headlamp assembly can also occur in other situations such as a car wash. And it can occur even when headlights bulbs are not turned on. For example, a car that's been driven in the daytime and parked can develop condensation as residual heat leaves the engine and warms the back side of the headlight assembly.

While most condensation in the headlight lens usually dissipates after approximately 20 minutes of driving with the low beams switched on, some small and insignificant areas of the lens may remain misted for a little longer. A normal amount of water condensation inside the headlamp assembly will not affect the optical functions of the headlight in any way, and will not cause any parts or wiring to corrode. To minimize condensation buildup inside the headlight, make sure any dust boots or covers are on tightly. Also make sure that the headlight vents are not blocked, which could prevent condensation from escaping.
If water collects inside your headlight to the point where puddles form, odds are you've got a crack in the headlight lens cover. Water can also leak in because of improper seals around dust boots where bulbs are inserted. If no cracks or holes are visible around the edges of the headlight, the problem could be the housing itself. If you can visibly locate a crack, it's best to repair it with sealant.