
FAQ
- Amplifiers
- Subwoofers & Speakers
- Signal Processors
- Marine & Powersports
- How do I install my amplifier or amplifiers?
-
Step 1, call a certified professional installer.
Chances are, if you are reading this, the “audio component installation” was not a career choice. For several hundred thousand people in the world, installing, tuning and mastering the complexities of installation is all they do.
If you would look on the internet for “how to operate on my spleen?” then perhaps you are the DIY type person that just must give it a shot. Here are a few guides that you may find helpful, before you decide to call a professional.
System DesignThe success of any car stereo system relies on several factors, such as the system design, execution of the installation, and system setup. Remember that any system is only as good as its weakest link.
Also, remember that higher power systems are not necessarily useful purely for high sound pressure levels, but also to establish headroom capability, to reproduce musical peaks cleanly without distortion. Lower power amplifiers will clip earlier than their more powerful cousins, and cause loudspeaker failure when overdriven, due to the distortion generated by a clipped signal, thus overheating voice coils.
Purchase the best quality RCA cables you can afford, for reliability and less engine noise interference in the audio system.
- What kind of Power/Ground wire should I choose for my amplifier and what should it cost?
-
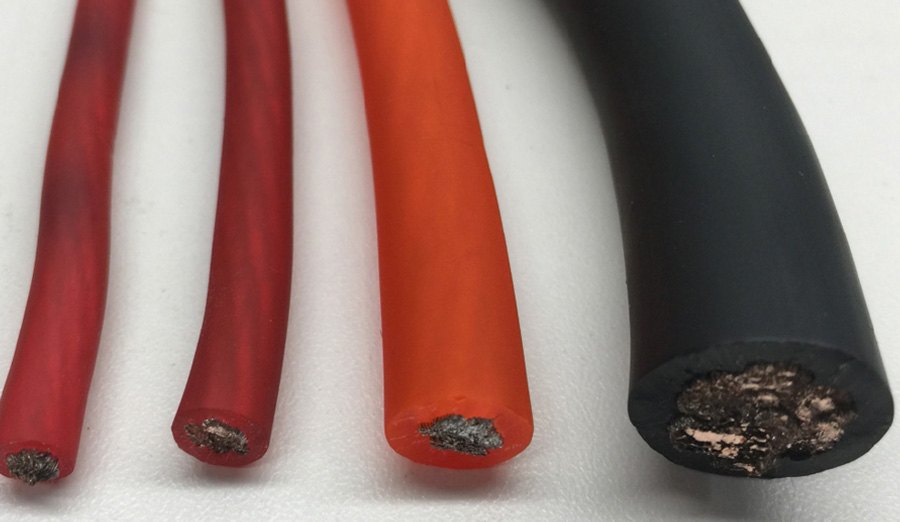
First, your target should ALWAYS be true copper. This will be marketed as 99.9% oxygen free copper wire.
You do NOT want CCA or Copper Clad Aluminum wire. This means that the copper content is wrapped around an aluminum core so that it “looks” like copper but it is really not. This CCA wire is not as conductive, can limit amplifier power and performance, and is susceptible to overheating as you will see demonstrated in the video below.

Here is a technical video from Garry Springgay of Cogent Labs comparing CCA versus Oxygen Free Copper. This short video will teach you everything you need to know about wire and what the problems are when you choose really poor quality cables for your expensive amplifier investment.
Secondly, when it comes to choosing an amplifier kit or buying the components, here is a very easy mathematical solution – spend 30%
FORMULAAmp Price x 30% OFC Amp Kit = Price of Amp Kit
EXAMPLE$300 Amp Investment x 30% = $90 Amp Kit
Depending on the extras that may be included like a nice fuse holder, upgraded RCA cable with gold ends, a twisted pair technology, zip ties for mounting the fuse, etc.. An amp kit like this may cost up to $150.
This is ok and you should feel great about your high performance system.
If you are hooking up your $300 amplifier investment to a $15 amp kit, you WILL have a problem with performance, longevity, and possibly have a complete melt down of your electrical system which could cause an alternator failure or worse - a car fire.
- How do I properly ground my amplifier?
-
You do it properly; it is the #1 mistake made installing and amplifier.
The Elusive Amplifier GroundWhy is the ground so important? Why does the power and ground wire have to be the same size? Why can’t I use the seat belt bolt? What is the proper way to ground?
Amplifiers are high current devices that require a lot of power to make power and with all that power coming into the amplifier, the exit path is just as important.
The wire size is very important for delivering the power (remember - what comes in must come out). With that being said, if you are using a 4 gauge wire on the battery lead, what would need to be used on the ground lead? That’s right folks, 4 gauge wire. If you don’t use the same size wire it will cause a “road block”, or in electronic terminology, resistance. A resistance may cause other issues like heat, noise or even failure of the amplifier.
 Ground Wires
The most commonly used ground point for an amplifier system is the seatbelt mount. The reason that this point is used is that it is easily accessible and very close to where the amplifier is mounted. But the seatbelt mount is NOT an acceptable location to ground the amplifier, because the seatbelt mount is designed and used for one thing, the safety of the occupants of the vehicle.
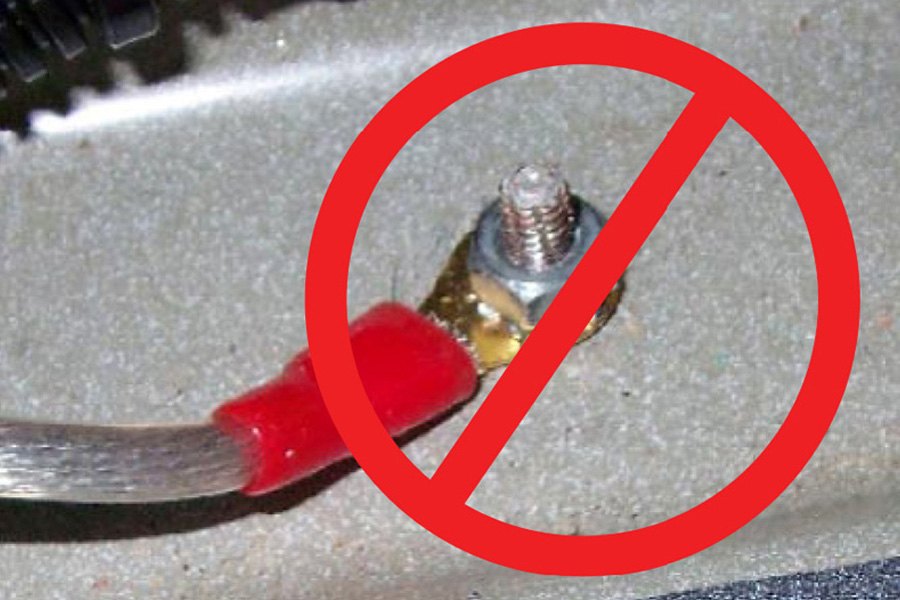 NO EXISITINGNO EXISITING BOLT OR SCREW IS ACCEPTABLE AS A GROUNDING LOCATION
The best ground for your audio system should be to clean, bare metal and as should also be as short as possible. Your entire vehicle is a big ground plane. Always look on the underside from where you are planning to ground to assure there is nothing in the way like brake lines, gas lines or even the gas tank.
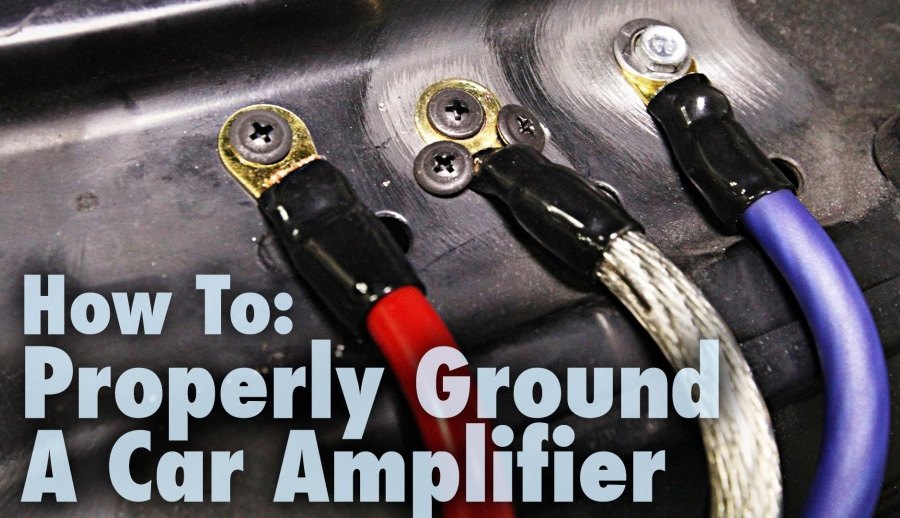 How to Properly Ground an Amplifier
Next, take a wire brush or even a piece of sandpaper and remove the paint to expose the metal The best way to secure your ground is to use a nut and bolt, but if that is not able to be done use the proper sized screw.
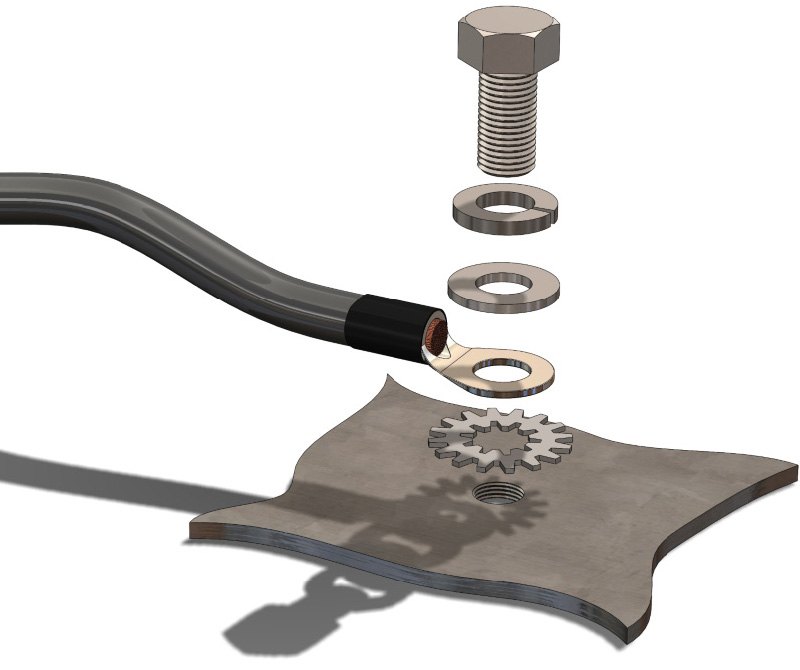 Wire Mount
In conclusion, the ground wire needs to be the same wire size as the power wire and mounted to a clean, bare metal panel as close to the amplifier as possible. By adhering to these few easy steps your high current stereo system should work flawlessly.
- How do I wire my amplifier for 4, 2 or 1 ohm?
-
Be very careful when you start wiring your subwoofer system. Some amplifiers are only 2 ohm stable, others are 1 ohm stable. If you are not familiar with how impedance and frequency are related, you need a professional installer and at minimum need to be working with a voltage meter.
Here are some guides. Each amplifier will be a little different, it is critical that you know the capabilities of your amplifier by reviewing the specifications in the individual owner’s manual.
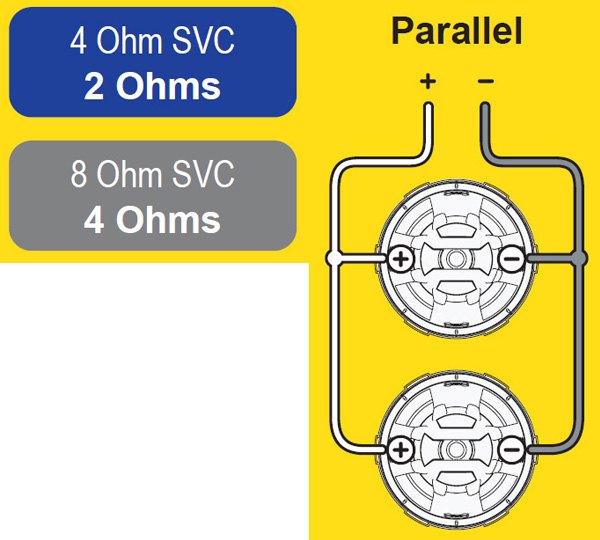
2 Ohm / 4 Ohm Amplifier LoadFollow this diagram for presenting your amplifiers a 2 or 4 ohm load depending of if you are using dual 4 ohm or dual 2 ohm subwoofers.
1 Ohm Amplifier Load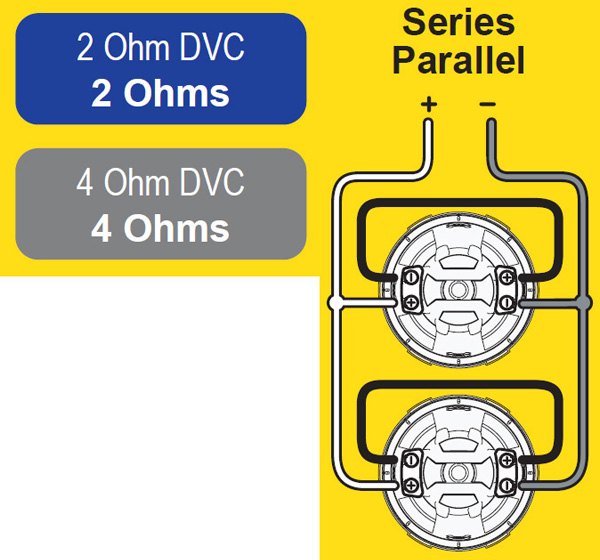 DUAL VOICE COIL SUBWOOFERS
Follow this diagram for presenting your amplifiers a 1 ohm load using 4 ohm DVC subwoofers.
WARNING – NEVER USE THIS CONFIGURATION WITH DUAL 2 OHM SUBWOOFERS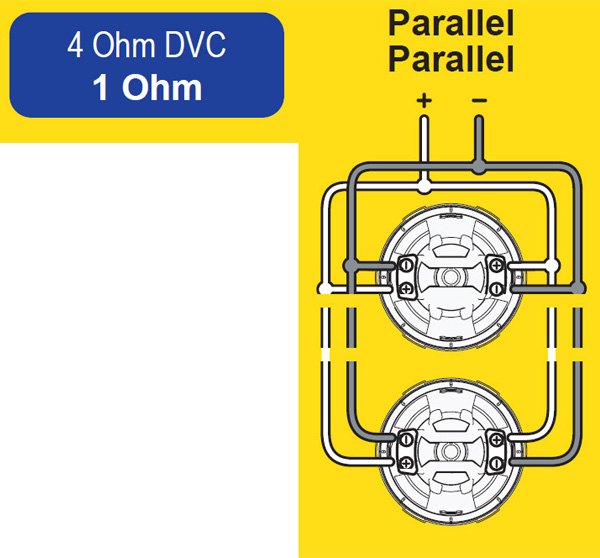 DUAL VOICE COIL SUBWOOFERS
1 Ohm / 2 Ohm Amplifier LoadFollow this diagram for presenting your amplifiers a 1 or 2 ohm load depending of if you are using dual 4 ohm or dual 2 ohm DVC subwoofers.
2 Ohm / 8 Ohm Amplifier Load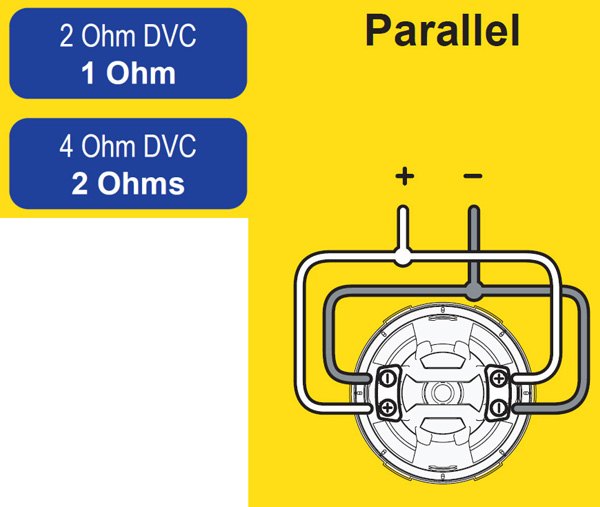 DUAL VOICE COIL SUBWOOFERS
Follow this diagram for presenting your amplifiers a 2 or 8 ohm load depending of if you are using dual 4 ohm or dual 2 ohm DVC subwoofers.
4 Ohm / 16 Ohm Amplifier Load DUAL VOICE COIL SUBWOOFERS
ollow this diagram for presenting your amplifiers a 4 or 16 ohm load depending when using SVC 4 ohm or single 8 ohm subwoofers.
2 Ohm / 4 Ohm Amplifier Load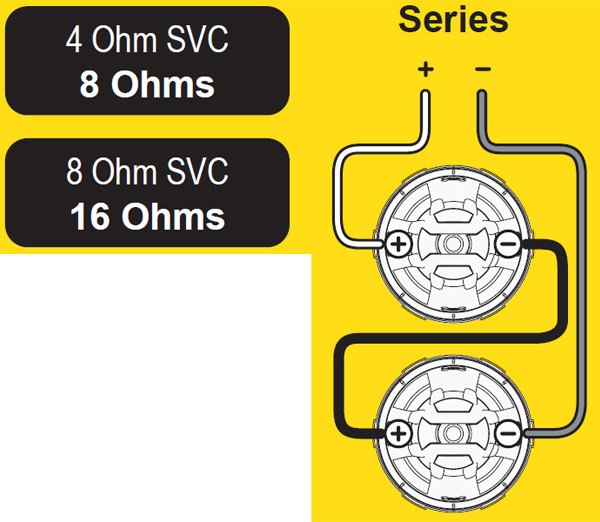 SINGLE VOICE COIL SUBWOOFERS
Follow this diagram for presenting your amplifiers a 2 or 4 ohm load when using SVC 4 ohm or single 8 ohm subwoofers.
 SINGLE VOICE COIL SUBWOOFERS
 - How do I bridge an amplifier?
-
Bridging an amplifier is a way to optimize your amplifier performance with your speaker configuration and system design. Bridging refers to combining two channels of an amplifier into one channel. This creates 2x the output voltage which in turn creates 2x the power.
Always confirm that your speakers can handle this amount of power. It is important to note that “bridging” is not the same as mono, you cannot bridge a monoblack amplifier as it is already a single channel.
A 4 ohm subwoofer system connected to an amplifier in bridged mode only “presents” half the impedance.
Also, many multi-channel amplifiers can be bridged, but again, you must confirm that a specific amplifier can be bridged. Always refer to the owner’s manual.
Typical wiring to bridge a two channel amplifier.
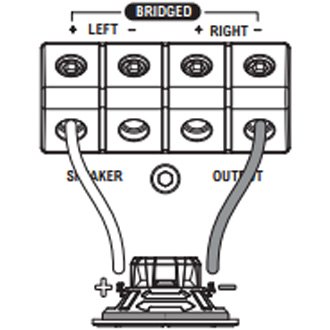 Amp Bridge
 - My amplifier has no output, I have tried everything, and I’m about to pull my eyebrows out, what am I missing?
-
Hifonics has noticed that customers with large mono amplifiers that feature “strapping” sometime inadvertently bump their master/slave switch.
If you are using a large mono amplifier alone, your amplifier should always be switched to master.
- My amplifier says it is Strappable. What does that mean?
-
When an amplifier is “Strappable” or Power Strappable, think of it as external bridging of two mono amplifiers. If you have two 1500 watt amplifiers you can combine them to create a 3000 watt amplifier system.
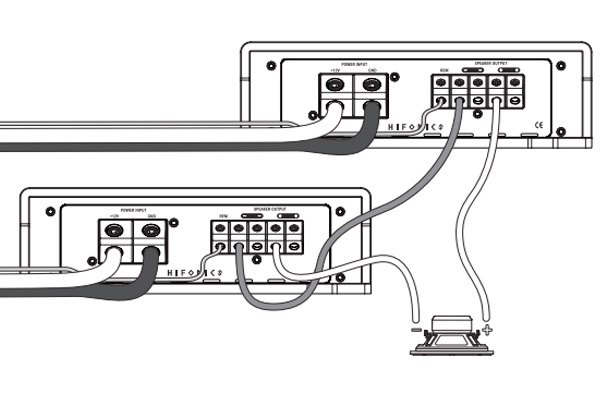 Amp Strappable
Level setting, crossover points, ground and phase settings are all very critical to this set up. Strapping should never be attempted by someone who is not an MECP certified installer. Power Strapping allows you and your installer to Sync the input signal and output power to double rated output of a mono amplifier to drive a single or group of subwoofers. Driving subwoofers with this method doubles the available power to the overall bass system, while insuring each subwoofer receives the exact same power level.
- How do I use two amplifiers together on one mono subwoofer?
-
See the answer to “Strappable” above.
- How do I use a High Pass or Low Pass electronic crossover?
-
An amplifier will have a High Pass or a Low Pass; a multi-channel amplifier will have both. They are very easy to understand. A HPF or “High Pass Filter” lets the high frequencies pass through to your speakers, while blocking the lower frequencies. An LPF or “Low Pass Filter” does the same, but allows the low frequencies to pass through.
The purpose of an amplifier having these filters or crossovers is to tailor the sound coming out of an amplifier to the speakers or subwoofers it is connected to. In this diagram from you can see where the frequencies begin to reduce in amplitude.
 5000 Hz Low and high Pass Curves (18 dB per Octave)
The crossover frequency is chosen by the setting on the dial or switch. Everything above or below the selected frequency is being sent through to your speakers.

- How do I use a parametric or quasi-parametric EQ?
-
The Parametric or Quasi-Parametric EQ featured in many amplifiers is designed to offer very advanced signal shaping to system designers. Typically, there are 3 adjustments.
- Center Frequency – This is where you tell the crossover which frequency you are going to adjust.
- Width – This is how you control whether you are going to adjust a very narrow band, say from 40Hz to 45Hz only.
- Boost – Once you have set the Center and Width, you adjust the gain or boost bass.
 Bass EQ
But, if not adjusted correctly, it can be over used and cause damage to your subwoofers and amplifiers. It is best to slowly turn this setting clockwise until the desired bass impact is felt. It is not recommended to exceed the 12 o’clock position unless listening at a low volume or a low recording quality as this can result in high distortion and premature clipping.
- How do I set the gain control on an amplifier?
-
The Gain control on an amplifier is designed to match the voltage coming out of a head unit, CD player, 8 track tape, etc. It is NOT a bonus volume control. Having a mismatched gain structure between your source unit and amplifier input stage will result in distorted sound. It will make you think you have a blown speaker or a blown amplifier. So, as always, the first step, is recruit the skills of a certified installer – preferably one that has MECP certification and at minimum, one with years of experience setting up and find tuning car audio systems.
Ensure that the Level is turned completely to the left prior to turning the system on. Next, you should play an audio track that you are familiar with to use as a reference, and turn the head unit volume control to about 80% of its full setting. The system sound level will of course be very low, and the following procedures will help you to match the amplifier input sensitivities properly to the head unit output signal level. Turn the level control up slowly, till you hear distortion, and then back off a few degrees on the control. If at any point your amplifier goes into protection, you will need to turn the level to the left a bit and then try again. If you reach a point where the output does not increase, stop turning the Level control to the right as the amplifier/subwoofer combo has reached its maximum output in this application. The Clipping Indicators on the end panel of the amp.
- My amplifier has a Phase control, what is that?
-
A variable Phase adjustment allows you to change the relative time that the waveform meets your ear. With standard subwoofer installations where the subwoofer is behind you, the Phase should generally be at 0. When subwoofers or woofers are in the kick panels or door panels, the Phase adjustment is useful in delaying the timing of the wave meeting your ear by adjusting the potentiometer until it sounds best to you.
- My amplifier has a subsonic filter, what is that?
-
The Subsonic Filter acts as a low frequency cut off for your system bass reproduction. For example, if you adjust the Subsonic to 25Hz, the amplifier will not play frequencies below 25Hz but will play frequencies from 25Hz up to the chosen Low Pass frequency.
- Why does my amplifier have an output set of RCA cables?
-
In an effort to reduce the number of signal cables needed for multi-amplifier systems, many amplifiers will offer a set of RCA outputs. These outputs are full range so you can connect the output to either a full range amplifier or subwoofer amplifiers.
- I need help with my installation. Can I install the product myself?
-
Most likely no. You need a certified installer to properly install and troubleshoot an installation.
Find certified professionals in your area and ask them if they are MECP certified.

Hifonics stands behind their products 100%. However, they cannot advise you on how to install or troubleshoot your system. The first step is always, read the owner’s manual. The manufacturer works hard to make sure that you can get your product installed in the car, and make it play music. Step two is, hire and pay for the help of a certified installer.
Imagine, you buy a kit airplane, you and your dad always talked about… “let’s build our own airplane in the garage” and you do. Then, when it’s all done, you call the manufacturer of that plane and say, “I have some questions about how to fly this product I bought from you. Can you teach me?”
There is the rub. Having it, buying it, getting a great price, is not the end of the process. Getting it installed, adjusting it, making it sound fantastic for you and your musical style, requires a trained professional. Not your neighbor’s nephew who took a woodshop class in 8th grade.
The industry states that, 90% of DIY installers did not go to school for car audio or automotive electronics. Today’s vehicles are very complex. Electrical systems are all tied together with safety controls like air bags, auto-start, On-Star communications, Navigation systems, etc. If you hook up the wrong thing to the wrong thing, you can have a serious issue on your hands.
Therefore, for safety, for liability reasons and the unpredictable nature of electrical systems and the complex systems in a vehicle, Hifonics cannot advise on installations.
DIYAs you can read from the previous paragraph, audio equipment installations can be complicated. It is not always as simple as “just drop it in” – unless, your project is as simple as “just drop it in.” Some projects really are designed for the “do it yourself” person with a bit of skill and a lot of common sense. Changing out a blown speaker, pretty simple, installing a sound bar, not really difficult. Just follow the manual, use the proper tools and as we have mentioned, consider a professional installer.
- Which direction should a subwoofer face for best performance?
-
There is no answer here. This will depend on the vehicle, the shape of the back of the car, hatch, trunk, etc.
Since sound comes to our ears in waves, the length of the wave is what is critical. So, you will just have to try a few options and find the placement and location that works best for your ears, taste in music and vehicle.
- How do I wire my subwoofers?
-
Be very careful when you start wiring your subwoofer system. Some amplifiers are only 2 ohm stable, others are 1 ohm stable. If you are not familiar with how impedance and frequency are related, you need a certified installer and at minimum need to be working with a voltage meter.
Here are some guidelines.
Each amplifier will be a little different, of course subwoofers are all different too. Different impedance, single or dual coils, how many you are using, in series, parallel or series/parallel are all critical pieces of information that you will need before you start “wiring up”.
It is very important that you know the capabilities of your amplifier by reviewing the specifications in the individual owner’s manual before wiring up the subwoofers.
2 Ohm / 4 Ohm Amplifier LoadFollow this diagram for presenting your amplifiers a 2 or 4 ohm load depending of if you are using dual 4 ohm or dual 2 ohm subwoofers.
1 Ohm Amplifier LoadDUAL VOICE COIL SUBWOOFERSFollow this diagram for presenting your amplifiers a 1 ohm load using 4 ohm DVC subwoofers.
WARNING – NEVER USE THIS CONFIGURATION WITH DUAL 2 OHM SUBWOOFERS. THE AMPLIFIER WILL BE DAMAGED.DUAL VOICE COIL SUBWOOFERS
1 Ohm / 2 Ohm Amplifier LoadFollow this diagram for presenting your amplifiers a 1 or 2 ohm load depending of if you are using dual 4 ohm or dual 2 ohm DVC subwoofers.
2 Ohm / 8 Ohm Amplifier LoadDUAL VOICE COIL SUBWOOFERSFollow this diagram for presenting your amplifiers a 2 or 8 ohm load depending of if you are using dual 4 ohm or dual 2 ohm DVC subwoofers.
4 Ohm / 16 Ohm Amplifier LoadDUAL VOICE COIL SUBWOOFERSFollow this diagram for presenting your amplifiers a 4 or 16 ohm load depending when using SVC 4 ohm or single 8 ohm subwoofers.
2 Ohm / 4 Ohm Amplifier LoadSINGLE VOICE COIL SUBWOOFERSFollow this diagram for presenting your amplifiers a 2 or 4 ohm load when using SVC 4 ohm or single 8 ohm subwoofers.
SINGLE VOICE COIL SUBWOOFERS - Does my subwoofer need a vented (ported) box or a sealed box?
-
Every subwoofer has a specific set of criteria called the Thiele / Small Parameters, sometimes called the T/S Specs. These specs help a certified installer know what type of enclosure or box to build. Many subwoofers can fit into a generic vented or sealed enclosure.
SealedSealed enclosures offer a range of performance profiles depending on the internal air volume. Larger enclosures will have a smoother, more extended response while a small enclosure will have increased output in a more focused frequency range.
Sealed enclosures are the simplest to construct but do require that the box be completely air tight.
Vented / Ported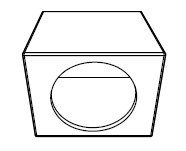 Sealed
Vented designs offer the ability to tune the enclosure. Larger enclosures will have a smoother, more extended response while a small enclosure will have increased output in a more focused frequency range. Vented enclosures are more difficult to construct but offer more overall output.
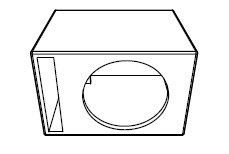 Vented/Ported
In order to design the best enclosure for a given subwoofer, you will need the Thiele / Small Parameters for that specific subwoofer. They will be located in the individual product manual for your subwoofer.
Hifonics manuals offer basic enclosure designs, both Sealed and Vented. Anything beyond those basic enclosures should be handled by a certified installer.
- How do I build an enclosure properly?
-
Enclosure materials are very important. You should try and use 5/8 inch or 3/4 inch MDF (Medium Density Fiber Board) is best for most applications, however, 3/4 inch MDF is best.
Enclosure Build MaterialsConnecting joints need to be glued and screwed to ensure no air escapes and joints do not separate under high pressure. Simple butt joints work well; however, rabbet joints are preferred.
BracingInternal bracing is also recommended to prevent flexing and to strengthen the enclosure.
Note: The volume taken up by the bracing should be added to the total enclosure interior volume.
There are two common bracing methods:
- Corner Bracing:These help prevent the connection joints from separating under heavy vibration and air pressure. Use 1 inch x 1 inch strips at all interior joints.
- Diagonal Bracing:These internal braces connect the top side to the bottom side as well front side to back side. This prevents the wood from bowing or pushing outwards. Use 1 inch x 2 inch braces that are glued and screwed.
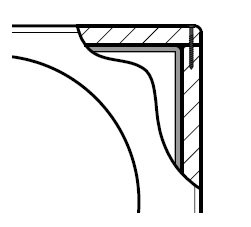 Glued
GluedDetails of a proper assembled, glued and screwed enclosure.
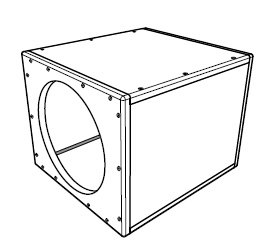 Screwed
 - I keep blowing up subwoofers, what is the problem?
-
This is hard to learn. Clean power, rarely blows speakers or subwoofers. Distortion is the enemy here. As an amplifier starts to produce more distortion that clean power, the speakers and subwoofers try to produce that signal. They are not made to do this. Everything starts to overheat, and things start to break.
When the signal or music begins to sound distorted (this is also called clipping), the subwoofers or speakers stop performing as they were designed to do.
The fix is to turn it down. Next, have a certified installer check your wiring. You may have accidently wired your system for the wrong impedance.
- I measured my car for subwoofers, how do I get to the cubic feet / volume measurement?
-
You only need this formula and use a calculator or a sharp pencil.
Length (in inches) x Width (in inches) x Depth (in inches) = XXXX
XXXX divided by 1728 = YYYY
YYYY will be your cubic feet volume of air
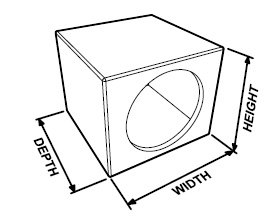 Dimensions
 - How do I set my Low Pass (LPF) Filter on my amp for my subwoofer?
-
The Low pass filter will allow only the bass frequencies to reach the woofer making for a more natural transition to the higher frequency drivers. You can make small adjustments to the LPF frequency and listen to the system with several tracks of your favorite music. Then you will find the best crossover point for you. Check your amplifier’s manual for details.
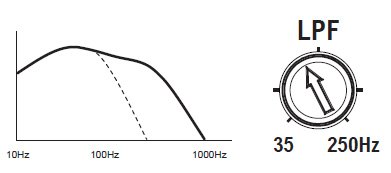 LPF
LPF - How do I set the Subsonic Filter on my amplifier to make my subwoofers sound great?
-
The Subsonic filter on your amplifier will help to protect the woofer from extreme low frequency distortion. These are tones that you cannot hear, but your subwoofer will try to produce. Many amplifiers are equipped with this type filter. Check your amplifier’s manual for details.
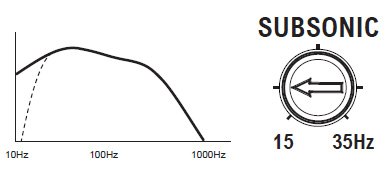 Subsonic
 - What are Thiele / Small Parameters?
-
These are the specs or parameters by which an engineer controls the performance of a subwoofer. These T/S specs are required for a certified installer to design and build a high performance, great sounding enclosure for a subwoofer system. You can read the history of Thiele / Small specs here.
Here is a common glossary of terms in subwoofer specifications.
Q:The energy losses of relative damping (ratio of stored to dissipated energy or ratio of reactive to resistive energy).
Fs: Free air resonance of driver in Hz.
Qms: Mechanical Q.
Vas: Volume of air equivalent to driver from the rest position.
Cms: Mechanical compliance of a loud speaker piston.
Mms: Moving mass of total loud speaker piston assembly.
Xmax: The maximum linear excursion of a loud speaker.
Sd: Surface area of the cone.
Dia: The piston diameter of a loud speaker.
Qes: Electrical Q of a system.
Re: DC resistance.
Le: VC inductance.
Pe: Maximum input power.
Qts: Total Q of the system.
Sens: Sensitivity. An efficiency measurement in dB’s.
Vc: Volume of a closed or sealed enclosure.
Vb: Volume of a vented enclosure.
Fc: The resonant frequency of a closed or sealed system.
Fb: The resonant frequency of a vented system.
F3: The half-power (-3dB) frequency of a loud speaker enclosure.
Qtc: The Q of a loud speaker at Fc in a closed box, considering both its electrical and mechanical resistance.
QL: The Q of a vented box, resulting from all box losses.
DV: Diameter of vent.
LV: Length of vent.
- I need help with my installation. Can I install the product myself?
-
Most likely no. You need a certified installer to properly install and troubleshoot an installation.
Find certified professionals in your area and ask them if they are MECP certified.
Hifonics stands behind their products 100%. However, they cannot advise you on how to install or troubleshoot your system. The first step is always, read the owner’s manual. The manufacturer works hard to make sure that you can get your product installed in the car, and make it play music. Step two is, hire and pay for the help of a certified installer.
Imagine, you buy a kit airplane, you and your dad always talked about… “let’s build our own airplane in the garage” and you do. Then, when it’s all done, you call the manufacturer of that plane and say, “I have some questions about how to fly this product I bought from you. Can you teach me?”
There is the rub. Having it, buying it, getting a great price, is not the end of the process. Getting it installed, adjusting it, making it sound fantastic for you and your musical style, requires a trained professional. Not your neighbor’s nephew who took a woodshop class in 8th grade.
The industry states that, 90% of DIY installers did not go to school for car audio or automotive electronics. Today’s vehicles are very complex. Electrical systems are all tied together with safety controls like air bags, auto-start, On-Star communications, Navigation systems, etc. If you hook up the wrong thing to the wrong thing, you can have a serious issue on your hands.
Therefore, for safety, for liability reasons and the unpredictable nature of electrical systems and the complex systems in a vehicle, Hifonics cannot advise on installations.
DIYAs you can read from the previous paragraph, audio equipment installations can be complicated. It is not always as simple as “just drop it in” – unless, your project is as simple as “just drop it in.” Some projects really are designed for the “do it yourself” person with a bit of skill and a lot of common sense. Changing out a blown speaker, pretty simple, installing a sound bar, not really difficult. Just follow the manual, use the proper tools and as we have mentioned, consider a professional installer.
- Why do people use signal processors?
-
Signal processing is already built into your system. It is everywhere. Inside your dash source unit with: bass, treble, fader and balance at a minimum. Some source units offer loudness contour and several equalization curves – even some you can customize. All of these are a form of signal processing.
Inside an amplifier, you will have switches and potentiometers to control crossover frequencies and features like bass boost. Even a remote bass control that you mount in the front of the vehicle is signal processing. Now you can see that signal processing is important.
- Do I need an external signal processor?
-
Perhaps you do. If you find that when your system is complete, that you do not have enough control to tailor the sound perfectly to your tastes, you may need a signal processor. There are a few options:
- IN-DASH: This type of unit typically has 3 or more bands of EQ, a Master System volume and may give you several additional inputs. These units are perfect for the person that finds nearly every track of music needs to have a little adjustment to the tone.
- BLACK BOX: Lots of options here. Many are simply adjusted by the Certified Installer and put away, others have external APPS that are used for set up, locked and not touched again. Many units in this category have DSP (digital signal processing) like time alignment. These tend to be very expensive and complex to set up.
- EXTERNAL CROSSOVER: These units are mean to modify the signal after the source unit before it gets assigned to amplifiers. When you hear people talk about 2, 3, 4, 5 amplifier systems (and more) that are using several external crossovers. Again, very complex to set up for the DIY – better call a certified installer.
- I need help with my installation. Can I install the product myself?
-
Most likely no. You need a certified installer to properly install and troubleshoot an installation.
Find certified professionals in your area and ask them if they are MECP certified.
Hifonics stands behind their products 100%. However, they cannot advise you on how to install or troubleshoot your system. The first step is always, read the owner’s manual. The manufacturer works hard to make sure that you can get your product installed in the car, and make it play music. Step two is, hire and pay for the help of a certified installer.
Imagine, you buy a kit airplane, you and your dad always talked about… “let’s build our own airplane in the garage” and you do. Then, when it’s all done, you call the manufacturer of that plane and say, “I have some questions about how to fly this product I bought from you. Can you teach me?”
There is the rub. Having it, buying it, getting a great price, is not the end of the process. Getting it installed, adjusting it, making it sound fantastic for you and your musical style, requires a trained professional. Not your neighbor’s nephew who took a woodshop class in 8th grade.
The industry states that, 90% of DIY installers did not go to school for car audio or automotive electronics. Today’s vehicles are very complex. Electrical systems are all tied together with safety controls like air bags, auto-start, On-Star communications, Navigation systems, etc. If you hook up the wrong thing to the wrong thing, you can have a serious issue on your hands.
Therefore, for safety, for liability reasons and the unpredictable nature of electrical systems and the complex systems in a vehicle, Hifonics cannot advise on installations.
DIYAs you can read from the previous paragraph, audio equipment installations can be complicated. It is not always as simple as “just drop it in” – unless, your project is as simple as “just drop it in.” Some projects really are designed for the “do it yourself” person with a bit of skill and a lot of common sense. Changing out a blown speaker, pretty simple, installing a sound bar, not really difficult. Just follow the manual, use the proper tools and as we have mentioned, consider a professional installer.
Soundbars
- Can I add a sound bar to my current audio system?
-
No, the Hifonics THOR sound bars have a Bluetooth controller which makes them a source unit. You would not put two radios in your car; therefore you would not install a sound bar if you already have a functioning audio system.
- I want to mount the sound bar on my unit using the “L” or angled bracket but the screws are not long enough. What do I do?
-
You can go to any hardware store and purchase two M5 x 20mm stainless steel bolts. You want stainless steel to avoid rust.
- I am powering up my sound bar for the first time, it will not turn on, what is wrong?
-
Make sure the orange accessory wire is attached to a switched 12-Volt connection.
The red (12 Volt +) must be connected to the + terminal of the battery with a fuse in line.
Some people install their sound bars by twisting the orange and red together, assuming they are both power. This is wrong. This will prevent the sound bar from turning “on” at all.
- How do I change between the input sources on my sound bar? For instance, switching from Bluetooth to the 3.5mm AUX input.
-
Press the power button quickly to switch between your source inputs. Be careful if you hold power too long, it will shut the unit “off” as this is the main power on/off switch.
Tower Speakers & Compression Horns
- My tower speakers are pointing up or down, and I would like them pointing straight forward. How can I do that?
-
You need the swivel mount bracket. The bracket will allow you to tilt your enclosure up or down 180 degrees. These are packaged as “each” you will need to purchase two of them.
Hifonics swivel mounts are available in black only. The mount works with all tower enclosures whether they are standard speakers, compression horns or 8-inch or 6.5-inch models.