
guide
- Installation Guide
- Service Life
- Troubleshooting
Replacing spark plugs may seem like a simple job, but proper procedures must be followed to ensure the best results. While you should always use the vehicle manufacturer’s service procedures, which may include removal of certain engine components to access the spark plugs, here is a basic a step-by-step guide.
- Be sure that the engine is cool before beginning.
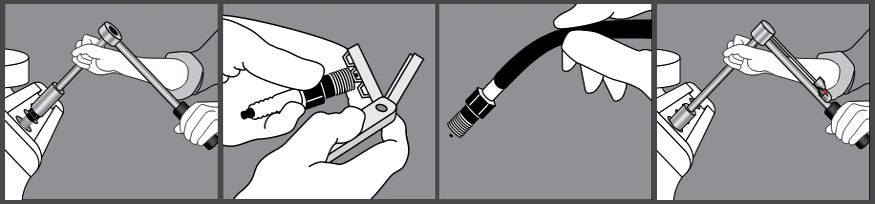
- Carefully remove the spark-plug boots. Grasp the boot, twist it about a quarter turn to break the seal, and then lift it straight off. If the boot does not break free easily, use a spark-plug boot puller. As you remove the boots and ignition wires, number them using tape and a marker.
- Clean the area around the spark plugs using a blast of compressed air, or by blowing through a soda straw. This prevents debris from falling into the combustion chamber when the old spark plugs are removed.
- Loosen each spark plug using the correct hex-head socket wrench.
- Remove the spark plugs and line them up in cylinder order. Inspect the spark plugs to identify any engine problems that may need attention.
- Gap the new spark plugs as recommended by the vehicle manufacturer. Use a rounded feeler gauge or a specific gapping tool to measure the gap between the center electrode and side electrode. The gauge should pass through the gap snugly but easily. If too loose or too tight, adjust the gap as needed.
- Screw the new spark plugs in by hand until just finger tight. If it is difficult to reach the spark plug socket, use a length of rubber hose to extend your reach.
- Tighten the spark plugs using a torque wrench and follo wing the vehic le manufacturer’s recommendations. If you do not have a torque wrench, use the tightening chart (below).
- Before replacing the ignition wires and spark-plug boots, check them for an y cracks or brittleness, or obvious signs of corrosion or wear. Replace the entire set if you detect any of the above defects.
- Place a small amount of dielectric grease inside the spark-plug boot where it connects to the spark-plug barrel (ribs). This will help ensure a tight, moisture resistant seal and help resist flashover.
- Replace the spark-plug wires in the correct order, following your marks. Make sure that the ignition wires are routed correctly and will not come into contact with hot engine components.
- Start the engine. If the engine misfires or idles badly , shut it off and double-check that the ignition wires are not crossed or connected poorly. Check the firing order and all the connections carefully.
Notes
- Always replace spark plugs as a complete set. This is especially important with computer-controlled ignition systems.
- It is very important to properly tighten all of the spark plugs. Too little torque can cause the spark plug to leak combustion gases. Over-torquing the spark plug can damage both the plug and the threads in the cylinder head.
- Do not use any grease or lubricant on the spark plug threads since this may result in over-torquing the spark plugs, and could lead to engine damage.
Torque Specifications

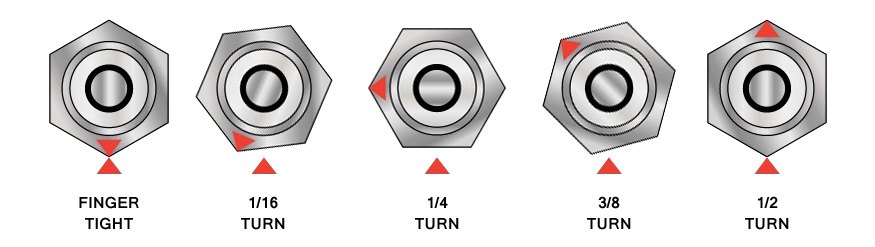
Installing Spark Plugs Without A Torque Wrench
It is always best to use a torque wrench to install spark plugs. If a torque wrench is not available, however, you may use this chart as a guide.
- 14 and 18mm tapered seat plug – tighten 1/16 turn after finger tight;
- 14 and 18mm gasket seat plug – tighten 1/2 turn past finger tight;
- 12mm gasket seat plug – tighten 3/8 turn past finger tight;
- 10mm gasket seat plug – tighten 1/4 turn past finger tight.
Note: These suggestions are for spark plugs with new gaskets.
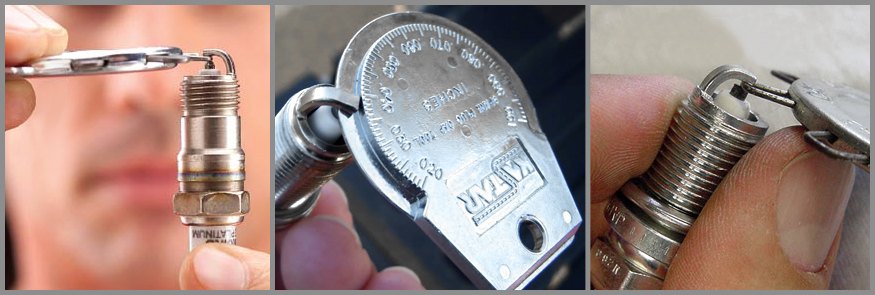
Proper Spark Plug Gap
The spark plug gap must be set properly before the plug is installed.
- If the gap is too wide, the electrical voltage may not be high enough to arc across, which would result in a misfire
- If the gap is too narrow, the spark may not ignite a “lean” air/fuel mixture, which would also result in a misfire
- Put another way, a spark plug’s voltage requirement is directly proportional to the size of the gap
Do not assume that the spark plug gap was preset at the factory when the spark plugs were made. While Autolite engineers pre-gap spark plugs for the most popular applications, the same spark plug may be designed for two different engines, and these may specify different gaps.
Before you install new spark plugs, adjust the gap using a spark plug gap tool or gap gauge – there are several different designs available.
- If you need to widen the gap, use the spark plug gap tool to pull back on the ground strap (also called the side electrode)
- If you need to close up the gap, gently tap the ground-strap electrode on a hard surface
- Important: Do not touch the center electrode or the insulator during this procedure, since these can be damaged
Service Life
Spark plugs are wear items. Even though some of the most premium spark plugs can last over 100,000 miles (160,000 km), eventually all spark plugs wear out and must be replaced to ensure consistent engine performance.
The tip of the center electrode and the ground-strap electrode probably face the most severe conditions, so wear will be most apparent at these points. The extent of electrode wear will vary based on:
- Engine type and operating conditions
- Materials used – iridium and platinum are designed to have longer service lives than other metal alloys
Misfiring
Owners should always follow the manufacturer’s suggested service interval unless there are driveability problems due to misfiring. Obviously the ideal service interval for a spark plug is to replace it before it starts to misfire.
Some of the possible causes of misfiring are listed below.
The electrical current is not strong enough to arc across the electrodes of the spark plug.
Possible Causes:
- Ignition coil voltage is too low due to battery condition
- Ignition coil voltage is too low due to ignition coil or igniter condition
- Voltage leak between the coil and the spark plugs
- Dirty or fouled spark plug
The required voltage is too high to ignite a flame kernel.
Possible Causes:
- Spark plug electrode wear
- Spark plug gap is too wide
- Defective connection between the high-voltage spark plug wires and the spark plug terminal
The spark plug fires normally, but the air/fuel mixture does not ignite.
Possible Causes:
- The spark plug gap is too narrow
- The air/fuel ratio is too lean or too rich
Catalytic-Converter Damaging Misfires
On modern engines with computer-controlled ignition systems and onboard diagnostics, certain types of misfires will trip the Malfunction Indicator Light (MIL – also called a check engine light). The driver may experience a rough idle, sluggish performance and/or poor fuel economy as a result of a misfire.
If the MIL flashes, this generally indicates a catalyst-damaging misfire, which must be investigated and repaired immediately.
Possible Causes:
- Fouled spark plugs
- Worn engine components
- Use of the wrong type of spark plug for the vehicle, such as Copper Core or Single Platinum plug used with a Distributorless Ignition System engine
- Faulty ignition wires or Coil On Plug boots
- A faulty ignition coil
Spark Plug Fouling
Many different factors can contribute to spark plug fouling:
- The air/fuel ratio is too rich due to incorrect carburetor adjustment or a poorly performing fuel injection system
- Worn piston rings or valve seals may allo w too much oil to enter the combustion chamber
- The ignition system may not be performing properly
- Prolonged idling or continuous low-speed driving may keep the spark plugs from reaching optimum operating temperatures
- Use of a spark plug with a heat range that is too cold
- A dirty air cleaner, which can create a too-rich condition
Plug Tips Tell the Story
Examining the spark plugs that are removed from an engine can help you determine if the engine has problems that need to be corrected. Here’s what to look for.
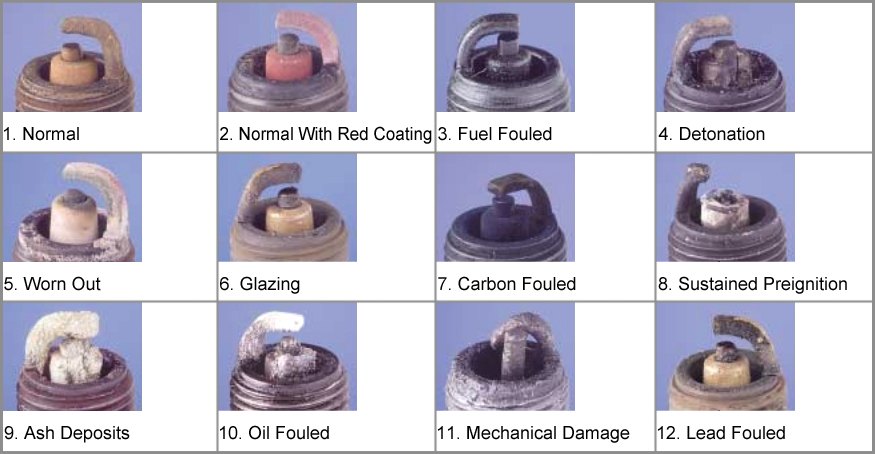
- 1. NORMAL
Appearance: Grayish-tan to white color
Recommendation: Correct heat range of spark plug is being used. Replace spark plug at the proper interval. - 2. NORMAL WITH RED COATING
Appearance: Pinkish-red color on the ceramic insulator tip, the center electrode, and the ground electrode.
Recommendation: Normal - coloration is from the use of additives in unleaded fuel. - 3. FUEL FOULED
Appearance: Firing tip is damp with gasoline, usually the odor of fuel is present on the spark plug. The insulator is often tinted the color of charcoal.
Recommendation: Indicates the cylinder from which the spark plug came is not using all the fuel supplied to it. Check for faulty or sticking choke, overly rich fuel mixture, ignition problems, leaking fuel injectors, or spark plug heat range is too cold. - 4. DETONATION
Appearance: Insulator is usually cracked, chipped, or broken. Ground electrode can also exhibit damage.
Recommendation: Caused by low octane fuel or over advanced timing. Can be noticed as engine knock. Check for faulty EGR system, detonation sensor, and correct spark plug heat range. - 5. WORN OUT
Appearance: Center and ground electrodes are eroded, have rounded edges, and are excessively worn away. Difficulty starting engine and misfiring during acceleration may occur.
Recommendation: Spark plug used beyond its intended life. Replace with a new set of spark plugs. - 6. GLAZING
Appearance: Ceramic insulator tip appears to have a melted, glazed coating.
Recommendation: Spark plug is operating too hot at high speeds. Replace with a colder heat range of spark plug. - 7. CARBON FOULED
Appearance: Black, sooty coating on firing end.
Recommendation: Spark plug heat range is too cold and/or caused by extensive low-speed, short distance driving. Replace with the correct heat range of spark plug. Also caused by weak ignition system and/or rich fuel mixture. Fuel injection engines would produce carbon fouling from clogged fuel injectors, vacuum leaks, and/or problem with carbon canister/purge valve operation. Carburetor equipped engines cause carbon fouling from improperly adjusted or malfunctioning choke. - 8. SUSTAINED PREIGNITION
Appearance: Melted center and ground electrodes and damaged ceramic insulator tip. Initial and sustained preignition are two extremes of the same engine problem.
Recommendation: Check for correct application of spark plug (heat range too hot, wrong spark plug for engine), cross firing of ignition cables, over advanced timing, lean fuel mixture, defective EGR valve, accumulation of combustion chamber deposits, hot spots in the combustion chamber due to poor heat dissipation, improper installation torque applied to spark plug, and/or head gasket protrusion into the combustion chamber. - 9. ASH DEPOSITS
Appearance: Center electrode, ground electrode, and/or ceramic insulator tip are coated with tan colored deposits.
Recommendation: Caused by the use of leaded fuel, fuel additives, and/or oil additives. Check for worn piston rings and/or valve guides. Misfiring may occur due to the deposits on the electrodes. - 10. OIL FOULED
Appearance: Center electrode, ground electrode, and/or ceramic insulator tip are coated with a black, oily substance.
Recommendation: Caused by presence of oil in the combustion chamber. Check for worn rings, worn valve guides, and/or worn valve seals. - 11. MECHANICAL DAMAGE
Appearance: Center electrode and ground electrode are bent out of position, down or to one side of the spark plug. Ceramic tip is broken and missing from the firing tip.
Recommendation: Locate and remove foreign object from inside of cylinder. Check catalog for proper spark plug application. Improper spark plug thread reach can protrude into cylinder and sustain damage. - 12. LEAD FOULED
Appearance: Ceramic insulator tip is coated with a brownish-yellow glazed coating.
Recommendation: Occurrence is from use of leaded fuel or fuel additives containing lead which become conductive over the firing tip. Install new spark plugs.
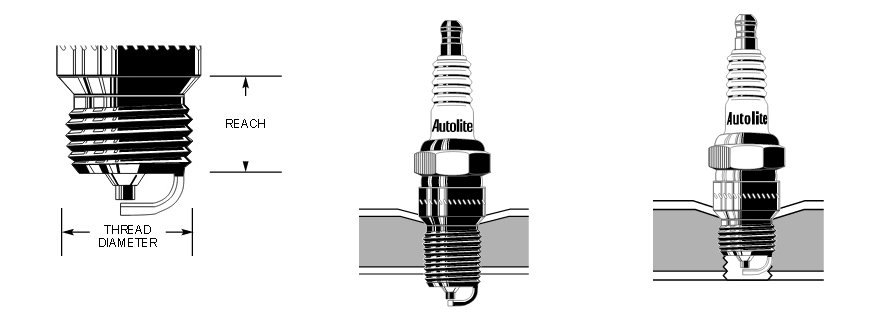
Understanding Spark Plug Sizes
To form a perfect seal in the combustion chamber, each spark plug must exactly match the dimensional characteristics of the cylinder head it is designed to fit in two important ways: (1) Thread Diameter, and (2) Reach.
Reach. Dimensional match is critical since it determines the position of the spark gap inside the combustion chamber.
Thread Diameter. Spark Plugs are made in 10, 12, 14, and 18 mm thread diameters. These thread dimensions have been standardized by the Society of Automotive Engineers (SAE) and are used by all spark plug manufacturers.
If Reach is Too Short:
- Shrouded gap may misfire
- Exposed cylinder head threads will collect combustion deposits and could cause pre-ignition
If Reach is Too Long:
- Pre-ignition may result from over heating exposed plug threads.
- Carbon deposits on exposed plug threads can cause damage to threads in cylinder head when plug removal is attempted.
- Severe engine damage (piston can hit the plug).
Improper Heat Range
If the spark plug is too cold for its application, it could lead to misfires due to fouling
If the spark plug used in an engine is too hot for its application, it could result in:
- Excessive rate of electrode erosion, excessive gap growth
- Center and ground electrode damage (burned or melted)
- Damaged engine valves
- Damaged pistons due to excessive pre-ignition
- 1. NORMAL