
Tech and Tips
- Power Brake Boosters for Classic Cars
- GM Valve Configurations
- Brake Drag Prevention

View of front of booster - All have this 2 stud spread which came on original GM muscle cars.
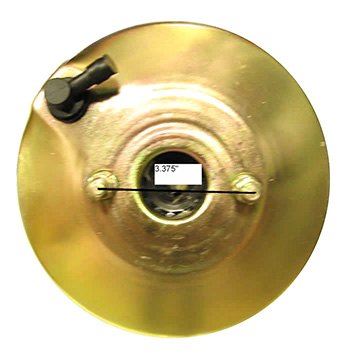
3.375" center to center on the two front bolts
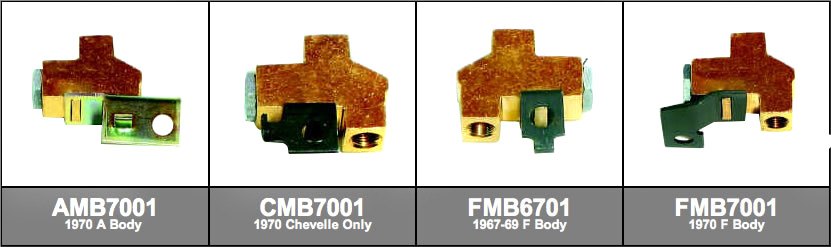
Booster Bracket Sets
These bracket sets can be added to Right Stuff Detailing boosters to make them bolt right on to certain applications.
* If you do not see brackets for your application, Right Stuff Detailing does not carry them. You can look at the dimensions on the two photos above and decide if you can adapt it to your vehicle.
BBK001 - 67-81 Camaro/Firebird, 64-72 GM A body cars (Chevelle, GTO, Cutlass, 442, etc.) 1968-74 Nova
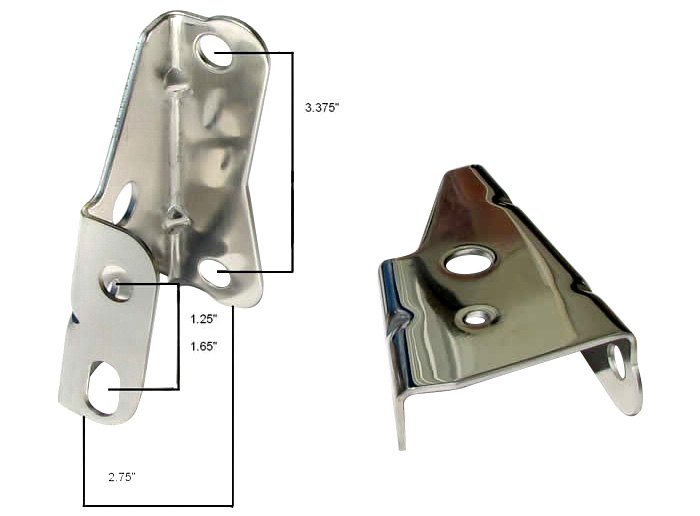
BBK002 - 55-58 Full Size Chevy Cars (Bel-Air, Biscayne, etc.)
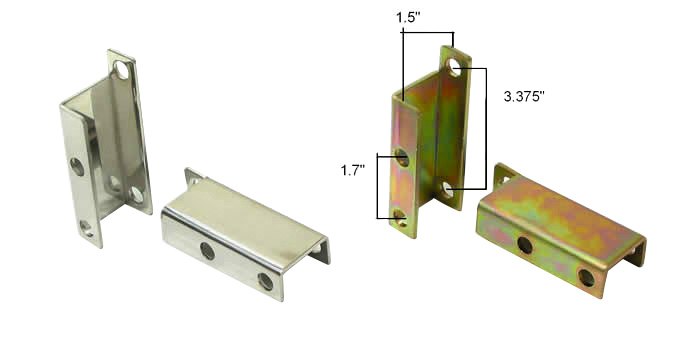
BBK004 - 59-68 Full Size Chevy Cars, 67-72 Chevy truck

Connecting to the Pedal
Once the booster is mounted, you will need to connect to the pedal. If the rod coming out of the booster is not long enough to reach the pedal, an extension rod can be used. Once the pedal is reached, one of Right Stuff Detailing clevis kits can be used.
1962-1966 A / F / X Body
All of these vehicles came from the factory with drum brakes and a single port master cylinder. When converting one of these vehicles to a dual port master cylinder, it is also necessary to change the distribution block to a later model 5 port distribution block. Otherwise you will have two lines coming out of the master cylinder and only one port to receive them in the block. Right Stuff Detailing currently does not carry replacement 4 port distribution blocks for 1962-1966 vehicles.
1967-1972 A / F / X Body with 4 Wheel Drum Brakes
All of these vehicles with 4 wheel drum brakes use a distribution block. The different options are shown below. This was the only block on a drum brake car.

GM A / F / X Body 1967-70 with Factory Front Disc and Rear Drum
From 1967-1970, factory front disc brake cars shared the same distribution block as the drum brake cars. GM used additional valves to improve overall system performance and meet federal guidelines under various road conditions. These metering blocks and proportioning valves are shown below.
1967-1970 GM A / F /X Body Metering Block
Metering blocks mount to a bracket bolted to the master cylinder mounting stud on the driver's side. '67 GTO is an exception, mounting on the passenger's side stud. This block features a single inlet and outlet. The black button must be depressed for vacuum bleeding. If you pressure bleed the system by pumping the brake pedal, you do not need to press this button.
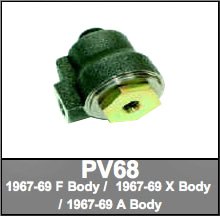
PV68 will function correctly on 1967-1969, but it is only an exact reproduction for 1969.
PV68 - 1967-69 A / F / X Body
PV67C - 1967 GTO
PV70C - 1970 A / F / X Body
1967-1970 GM A / F / X Body Proportioning Valves
These valves mount on the frame inline in the brake line that runs from the distribution block to the hose at the center of the rear axle. Not all cars with disc brakes had this style of valve.
1971-1977 Factory Front Disc / Rear Drum Vehicles

Starting in 1971, all the functions were built into a single block. This valve combines the distribution block, proportioning valve and metering block into one piece. This will be the only block on the front of these vehicles.
The wiring pigtail on the top is for a dash warning light. It is not required for proper function.
The black boot in the front of the valve simply covers the metering assembly. It is not required to press this button to bleed the brakes.
GM Disc Brake Conversion Valves
The vast majority of disc brake conversion kits on the market today include one of two style valves. The most common is the 1971-1977 GM style valve shown below. This includes kits for the GM A / F / X body vehicles referenced above, as well as full size Chevy vehicles such as Bel-Air, Biscayne, Impala, Nomad, etc. Other kits make the customer use their factory distribution block along with an adjustable valve. It is important to know the type and location of valve if you want to purchase a brake line package.

Preventing Brake Drag in Power Brake Systems
Adjusting the rod between the booster and the master cylinder
Right Stuff Detailing sells a lot of different boosters and master cylinders, and they all connect together differently. Regardless of what booster and master combo you have, you need to make sure that the rod that pushes into the master cylinder from the brake booster is adjusted properly. Be sure that when the master cylinder is bolted up tight, the rod protruding from the booster is about 1/16” from making contact with the piston of the master cylinder. Obviously, this is something you cannot see once bolted up, so you may need to measure the depth of your master cylinder pocket and the length of the booster rod.
The booster rod should almost be making contact with the master cylinder, but not actually touching. In a master cylinder with a deep pocket, the rod will have to enter the master cylinder by about 1.5” before making contact.
- If the rod is too long, you will notice that the master cylinder does not slide freely up to contact the booster because the booster rod and master cylinder piston are pressing against each other. This will “pre-load” your master cylinder causing your brakes to drag at first and eventually heat up and get worse the further you drive.
- If the rod is too short, you will press the pedal but you will not actually be engaging the piston of the master cylinder because the booster rod is not making contact. This may be your issue if you are having trouble getting fluid to bleed to the wheels.
If the booster rod is too long, here is how to fix it. There are two different booster styles, therefore two sets of instructions:
1. Right Stuff Detailing “Delco Style” 9” and 11” boosters include a long and short rod as seen below:

Long Rod in Booster

Short Pocket and Deep Pocket

Short Rod in Booster
If you have the “Delco Style” booster seen in the illustration, you will first need to install the correct booster rod. You want to use the short booster rod if your master cylinder has a short pocket and the long booster rod if your master has a deep pocket. This usually is all you need to do to have the proper set-up. (see photos)
If you use the correct booster rod and you still have pressure on the master cylinder due to the rod being too long, check to make sure the rod is fully seated down into the booster as far as it will go. When the booster rod is installed, the end that goes into the booster sits in a small hole in a washer down in the booster. If this washer is off center, the rod will not sit down far enough into the booster. You can re-center this washer with a screwdriver if needed. If your booster rod is seated all the way into the booster and you still have pre-load, you may need to grind down the end of the rod that presses into the master cylinder 1/8” at a time until the pressure is released. (this is due to variations in aftermarket master cylinder pocket depths and is usually not necessary)
2. If your booster has a rod that is part of the booster like below, and you have a pre-load issue, follow these instructions:

The screw seen at the center of the booster is adjustable. It can be screwed in or out to give you the proper length to mate up to your master cylinder piston. Sometimes this screw will be too long, even when it is screwed all the way in. This causes a pre-load on your master cylinder. In this case, you should completely remove the screw from the booster, take off the small brass neural that is near the tip of the screw and reinstall the screw. Removal of this little “neural” will give you the extra 1/8” that is sometimes needed to get the correct length. Still too long? Remove the screw completely and bolt master cylinder up (this is usually not necessary).
If the booster rod is too short, you need to install the longer booster rod. If your booster does not have a removable booster rod, you may need to order one of the plugs seen in the photo below to shorten the depth of your master cylinder pocket.
Note: Most of Right Stuff Detailing master cylinders have a deep pocket with a plug to make it short if needed. If your booster’s rod is short, you may need to order a plug (MCBUL01) to fill space in your master cylinder.