
FAQS
- Choosing Speakers
- Setting Car Audio System
- Service Issues
- What size wire should I use?
-
Your Polk PA Series amplifiers accept power source cables up to 4 gauge. Speaker wire outputs accept up to 12 gauge speaker wire. Keep positive to positive and negative to negative on all connections to avoid damage and reduced performance.
- I’ve never heard of Polk Audio. Is your company reputable?
-
Polk Audio was founded in 1972 in Baltimore. Today, Polk Audio is considered one of the leading audio companies in the world. The company’s headquarters are still located in Baltimore. Baltimore, Maryland based Polk Audio is an award-winning manufacturer of high-performance audio products. Founded by Chairman Matthew Polk and CEO George Klopfer in 1972, Polk Audio holds over 50 patents for advances in audio design and technology. Polk products include loudspeakers and electronic components for home, auto, marine applications, the first XM satellite home component tuner, the world’s first active IP-addressable loudspeaker, and in the winter of 2005-2006 the I-Sonic, the first entertainment system to include HD radio, XM Connect and Play capability and a DVD player.
- What does Marine Certified mean?
-
After Polk Audio had made its db, DXi and MM Series products perform superbly in a car, they took them where few speaker components and parts dare go: on the water. The company’s engineers and designers wanted to put their products to the test, so they subjected everything to ASTM (American Society for Testing and Materials) scrutiny to ensure db, DXi and MM Series products performed as well on the water as they did on the boulevard.
These speakers were put under two grueling tests — B117-03 Standard Practice for Operating Salt Spray (Fog) Apparatus and D4329-99 Standard Practice for Fluorescent UV Exposure of Plastics to see if they could stand up to the harsh marine environment.
Under the procedures for the Salt Fog test, components were exposed to a temperature of 95 degrees Fahrenheit and a 5% salt solution for 500 hours. Under the Ultra Violet test, components were placed in an accelerated weathering machine and subjected to a series of conditions for a test period of 500 hours. Those conditions included 8 hours of UV-B light, black body temperature of 60 degrees Celsius and 4 hours condensate water, black body temperature of 40 degrees Celsius. This cycle was repeated continuously during the test period.
Sea Ray and Correct Craft boats, two leaders in their respective categories, spec Polk products, testament to the quality of all three of these amazing series.
So which marine certified Polk speakers are right for you? Well, the fact is that all of Polk db, DXi and MM series pass marine certification tests.
- What is the difference between a coaxial speaker and a component system?
-
Coaxial speakers
These are comprised of a driver and a tweeter. This is often referred to as a two-way speaker. The driver reproduces the bass and midrange frequencies, and the tweeter reproduces the higher frequencies. (There are also 3-way speakers available such as the DB691 and the MM691. These speakers use a separate bass driver, midrange driver, and tweeter.) The driver and tweeter are installed together into a single basket or frame, with the tweeter mounted onto a tweeter post, which is attached to the speaker in the center of the voice coil. The crossover used in coaxial speakers is usually a first order filter consisting of a single capacitor and inductor. The crossover components are attached to the baskets of the speaker, so no external mounting is required.
Component speakers
These consist of a bass/midrange driver, which reproduces bass and midrange frequencies and a tweeter which reproduces high frequencies. There is also an external passive crossover which is installed into a small plastic enclosure. The crossover separates the bass/midrange frequencies and high frequencies and sends them to the driver and tweeter, respectively. Some passive crossovers will allow you to increase and/or decrease the output level of the tweeters. The installation is more complicated than a coaxial speaker. The bass driver, tweeter and passive crossover all have to be installed separately and will require more time to install. You also have to make certain that the driver and tweeter locations are identical for both doors and that there are no obstructions that may hinder the installation, such as power window mechanisms, window tracks, window cranks, or a dashboard. When making cutouts, the old rule applies: always measure twice and cut once. The passive crossover can be installed in a variety of locations: under the dash, in the trunk next to the amplifier or under the seats. It is not recommended to install the crossovers inside the doors due to potential water damage. Water damage is not covered under the company’s warranty.
The main advantages of a component system over a coaxial speaker are better sound because of the possible installation locations for the tweeter, and a broader frequency response. Be aware that by installing the tweeter higher up on the door panel or dash, you will improve the overall sound stage and imaging of your system. Coaxial speakers do not allow you to do this.
When locating your tweeters, experts at Polk Audio recommend using double-sided tape attached to the back of the tweeter and trying different locations on the doors and dash. This will let you hear where the tweeter sounds best before you commit to an installation location.
The passive crossovers used in component systems are more complex than those found in coaxial speakers. Most component systems use a second order (12 dB) or a third order (18 dB) crossover slope. This provides a steeper rate of attenuation of outer band frequencies after the crossover point, and allows for better integration between the driver and tweeter. It also improves power handling. The components (resistors, inductors, capacitors and printed circuit boards) used in the construction of Polk Audio passive crossovers are of the highest quality and are manufactured to very tight tolerances.
- How do I wire my amp to a sub?
-
Wiring your subwoofers to your amplifier can be tricky, that’s why Polk Audio created these wiring diagrams. You don’t want to blow up your subwoofers or your amp. (At Polk, they recommend that you skip right over to your local Authorized Polk Audio Dealer and get a pro to do your install.) If you blipped right over that sentence in the parens, the company has gone ahead and made it easy for you to find the proper wiring method with these diagrams.
Below are wiring diagrams for 1, 2, 3, and 4 subwoofer configurations for both single voice coil subwoofers (SVC) and dual voice coil subwoofers (DVC).
1 SVC DriverThe simplest way to hook up a subwoofer. The total impedance of this system is 4 Ohms.
1 DVC Driver
When using a 4 Ohm Dual Voice Coil (DVC) subwoofer, the total impedance of this system is 2 Ohms.
1 DVC Driver
When using a 4 Ohm Dual Voice Coil (DVC) subwoofer, the total impedance of this system is 8 Ohms.
2 SVC Driver
These two wiring diagrams are identical, because the SUB 1 output is paralleled to the SUB 2 output. If you don't want to crimp the wires together, the extra SUB 2 output is an excellent way to connect your subwoofers. The total impedance of these systems is 2 Ohms.
2 DVC Driver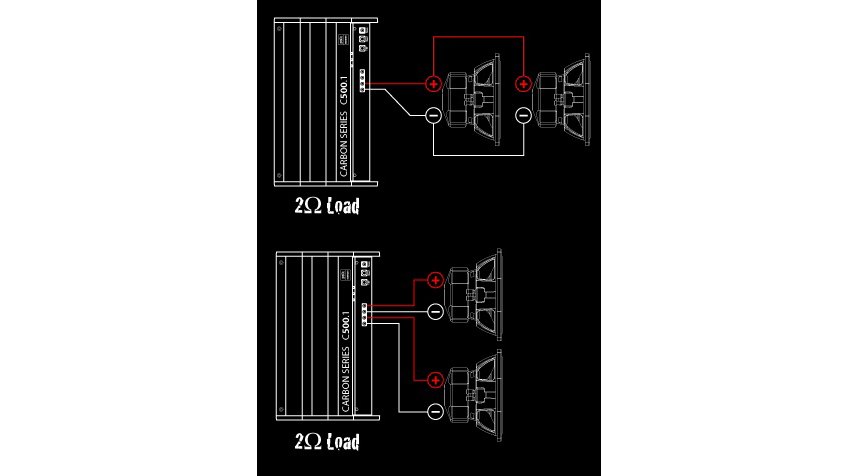
Do not wire 2 DVC drivers in parallel configuration. Polk PA Series amps are only stable down to 2 Ohms. The total impedance of this system is 1 Ohms.
2 DVC Driver
When using a 4 Ohm Dual Voice Coil (DVC) subwoofer, the total impedance of this system is 4 Ohms.
3 DVC Driver
When using a 4 Ohm Dual Voice Coil (DVC) subwoofer, the total impedance of this system is 2.67 Ohms.
3 & 4 SVC Driver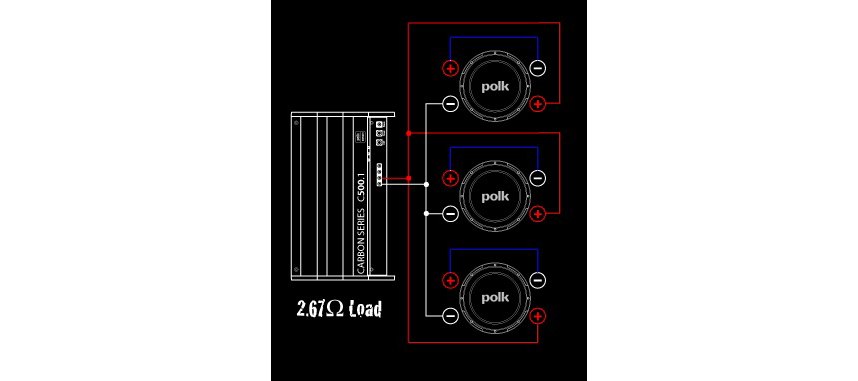
Do not wire your subwoofers in a parallel configuration with 4 Ohm Single Voice Coil (SVC) Subwoofers if you have more than 2 subwoofers. Polk PA Series amps are only stable down to 2 Ohms. You must use 8 Ohm or higher subwoofers if you want to configure 3 or more subwoofers in parallel.
4 DVC Driver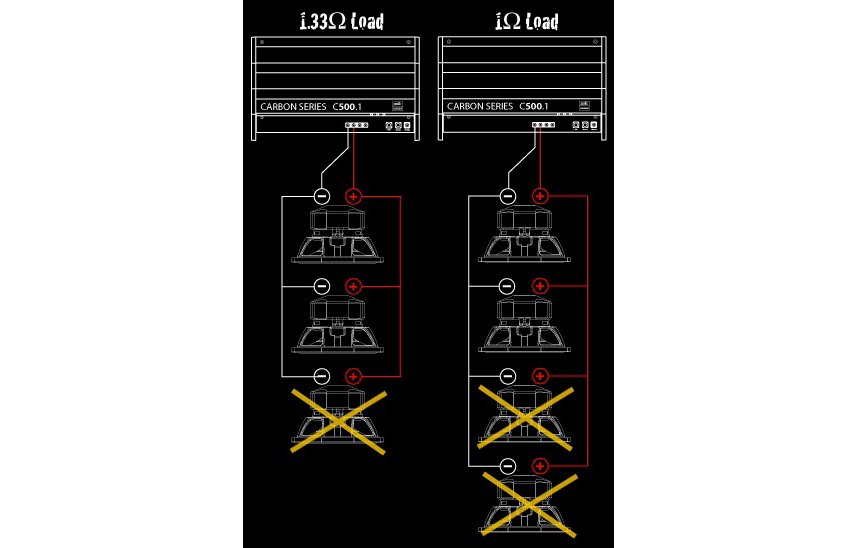
When using a 4 Ohm Dual Voice Coil (DVC) subwoofer, the total impedance of this system is 2 Ohms.
4 SVC Driver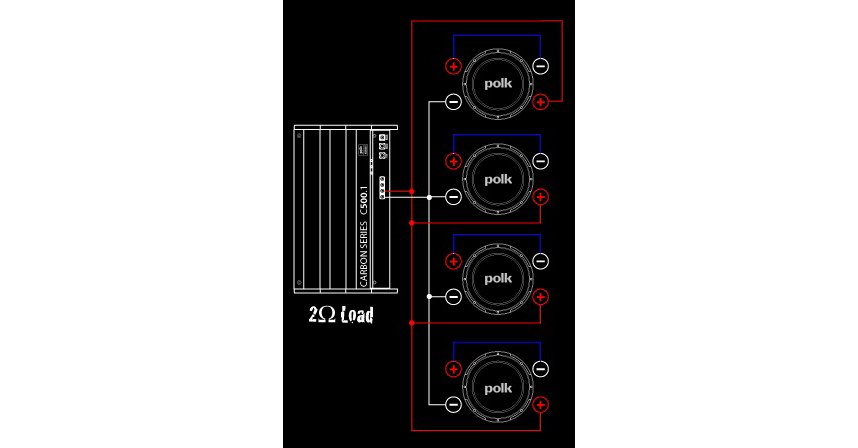
Total impedance of this system is 4 Ohms.

- What are the LED’s on my amp for?
-
Power
This indicates that the amplifier is receiving the proper remote and power supply voltage and the unit is on. When the amp is on, a blue colored LED illuminates.
Thermal ProtectionThe amplifier has reached an unsafe operating temperature and has to be turned off to protect the output transistors from being damaged.
Short ProtectionThe amplifier is sensing a shorted speaker or speaker wire.
- How do I make initial setup settings on my amp?
-
It is recommended to set the gain control initially to the 11 o'clock position. Once the setting is made, increase the gain until the source begins to distort and then back off slightly. Do not exceed the gain much beyond a maximum of the 2 o'clock position. Exceeding this recommended setting can induce harmful distortion into the system.
- How do I protect my amp?
-
Just be strong. Protect your amp and your vehicle with a circuit breaker or in-line fuse placed no more than 12" (30cm) from your battery. This circuit breaker or fuse should be no greater than the fuse(s) of your amplifier for optimal protection. For example, your Polk PA Series amplifier has two 25A fuses. Your vehicle protection fuse should be rated at 50A. See your authorized Polk AutoSound Dealer for professional advice on fuses and circuit breakers.
- How do I safely route my wires from the front of my car to the back?
-
Never run audio signal wires next to electrical power wires, because you will get loads of noise interference. Run audio signal wires down one side of the car, and electrical power wires down the other. Never run wires outside the car or under the car. Run them under the carpeting or behind the plastic pieces. If you have to drill through metal to run wires between compartments, use rubber grommets to pad the holes so the wires don’t scrape the metal.
- Where can I safely install my amp for best performance?
-
You can install your amps pretty much anywhere you can:
- Get a good short ground connection
- Get a secure, screwed down location so the amp does not move around and most important
- anywhere the amp will have enough breathing space to be able to properly vent itself so it doesn’t overheat. Under your car seat is a good place.
Carbon Series Amps have a low profile so they fit easily down there and it’s a pretty easy place to connect wires and make adjustments (although you do have to remove your seat to do the initial installation).
- Why does my amplifier keep turning off?
-
Your amplifier can be shutting down due to one or more conditions:
- The amplifier may be sensing an impedance too low due to a shorted or blown speaker. If you have a VOM (Volt/Ohm meter) use it to measure the DC resistance at the amplifier’s end of the speaker wire connections. If you see "0" Ohms there’s a problem.
- The speaker wire may have been shorted or pinched when it was installed.
- The operating temperature of the amplifier has reached an unsafe temperature and needs time to cool down to resume normal operation. This occurs usually when you have really cranked up your sub’s volume. Be patient and it will start playing again, usually within 20 to 30 minutes. Turn the volume down to prevent this from reoccurring. Check to make sure you have provided sufficient ventilation for the amp.
- The input voltage feeding the amplifier maybe dropping below 10 Volts or the remote trigger wire may be shorted or may not have sufficient voltage to turn on the amplifier. It is recommended to check the remote and power supply voltage with a VOM. Measure the voltage present at the amplifier and at your car’s battery to see if there is a significant voltage drop between these two points.
- Why isn’t my subwoofer loud enough?
-
There can be a couple of reasons for a reduced subwoofer volume level for your subwoofer.
Check the phase or polarity of the wires connecting the subwoofer. To obtain better performance it maybe necessary to invert or reverse the speaker wire connections at the subwoofer or amplifier.
You may have to install a passive crossover to block lower bass on both the front and rear speakers to eliminate cancellation. This occurs when the front and rear speakers are reproducing the same lower bass information that the subwoofer is producing. In some case inverting the phase on the front and rear speakers will not correct this problem so it is necessary to install a crossover.
The installation location of the subwoofer can severely affect the lower bass performance capabilities of your sub. You may have to experiment with different locations to obtain the best possible bass performance. Every vehicle’s transfer function (frequency where the vehicle’s interior volume begins adding to the total bass output) is different so this will be an exercise in trial and error.
Check the manufacturer’s recommendations for the proper type of enclosure (sealed, ported or bandpass) and internal box volume. If you are using a ported or bandpass enclosure, make sure that the ports are cut to the exact length and are the correct diameter. An improperly tuned enclosure can sound pretty bad.
- Why isn’t my amp turning on?
-
Check the electrical connections of your amplifier for any loose connections by using a Volt/Ohm meter. The DC input voltage for both the main power feed from the battery and the remote turn on terminal on the amplifier should measure 12 Volts to 14.4 Volts DC. If the input and remote trigger voltage drops below 10 Volts most amplifiers will not turn on.
Check for blown fuses on the amplifier. If the fuses are blown there could be a reason that they have failed. Make sure to replace the fuses with the same amperage rating. Never install a higher amperage fuse back into the amplifier. This may cause damage to your amplifier. The amplifier may have been overdriven, or there could be a shorted or pinched speaker wire. If the fuses continue to blow, you may need to have your dealer send the amplifier back to the manufacturer for service.
Make sure that you have not accidentally connected the remote turn on leads to the power antenna wire on the back of your head unit. Some head units have a separate power antenna and amplifier remote turn on leads. The amplifier will turn on when listening to the radio, but it will not turn on when listening to a CD or any other external source.
- Why is my amp humming?
-
“Hum” and “whine” can be symptoms of improper grounding or crossed cables. Make sure your audio and power cables are separated from each other. Make sure you have grounded the amp properly. Good ground is close to the amp, and direct to the metal chassis of the car. Use the same gauge wire you use for your power cable, remove any paint at the ground point for a clean metal to metal contact, and use a “star” washer to get the best grip on the ground connection.