
- Techniques
- Mix Chart
- Cleaning
- Recommendations
Als Liner DIY Truck Bed Liner Kits can be applied to almost any surface you need to protect. Below are the manufacturers recommendations and suggestions to achieve the textures and thickness your unique project demands.
Reaching your desired thickness
Since most spray on bed liner systems are not developed with the versatility of the Als Liner Kit, they will usually tell you that you have to apply your coating with a 65 mil thickness. At Als Liner, the highly-qualified engineers know that no two projects are the same, so they designed Als Liner bed liner kits to be effective at various thicknesses. With one gallon of Als Liner truck bed liner, you will get 20-50 mils thickness across a 60 SF area and 60 to 65 mils thickness across a 20 SF area. The company has found that the easiest way to determine the depth of your spray on bed liner (without using a mil gauge) is to simply measure out your area to be sprayed and then determine the amount of material needed using the guidelines above. For example, 20 SF at 25 mils would require 1/3 gallon of Als Liner. Please remember it is simple to make your own mil gauge using a piece of thin sheet metal, cutting it to a point and marking the required depth. This will help novice applicators get the feel for applying an even coat of Als Liner DIY Truck Bed Liner.
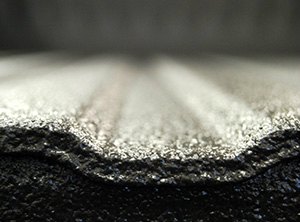
Achieving Different Textures (Air Flow and Trigger Control)
The Als Liner Spray Gun offers a wide range of textures using air flow settings and trigger control. When trying to vary the roughness of your texture, the simplest method is to play with your air flow and trigger. You can increase the air flow and reduce the pull on your trigger to break the material into smaller particles and get the rough grainy texture of sand paper. If you want to get an orange peel look or larger texture that will smooth out during the curing process, reduce the air flow and pull the gun trigger farther to increase the size of the particles sprayed from the tip. You can adjust these settings to fine tune the texture and still maintain the vertical hang of the bed liner material.
Achieving Different Textures (Reducing the Catalyzer Mix)
While the Als Liner 3 Part Batch System allows you to just mix and use the components in the kit, you can change the mix slightly to customize your texture even further. The catalyzer (the C Component) is what provides the vertical hang in the mixture, causing the material to thicken and producing the standard bed liner texture. By reducing the amount of the C Component that is listed in the mix chart, you can reduce the thickness and increase the cure time of the material allowing for a smoother finish. To achieve this texture, simply cut the C Component in half. Using this method and the air flow and trigger methods you can achieve a virtually smooth finish.
The down side to reducing the C Component is the loss of vertical hang. With the reduction in the C Component, you will see some dripping or sagging of your application on vertical surfaces. To prevent sag, simply reduce the thickness of your applications and apply multiple layers to get the depth you are looking for. With a 1/2 ratio of C Component, the manufacturer recommends applying no more than 20 mils at one time. Allow it to set for 10-15 minutes and spray the second layer. The material will bond to itself and allow you to get a 65 mil thickness if you so desire.
Adding Metallic Flake or Aggregates to Al's Liner DIY Truck Bed Liner Kits
Als Liner DIY Truck Bed Liner Kits are compatible with a large variety of additives. Whether youre adding metallic flake for appearance or aggregates for non-skid and traction control, Als Liner will stay durable and look great.
- Brush Techniques
-
Als Liner DIY Truck Bed Liner Kits can be applied with standard paint brushes and rollers so that you can apply Als Liner just about anywhere. The manufacturer recommends using a shed resistant brush to keep bristles from getting stuck in the material. For a set of brushes that are suited perfectly to Als Liner projects, check out the Als Liner Roller/Brush Kit.
Brushing allows for a nice array of textures and applications of Als Liner, but it requires more care during the application to keep a consistent texture. You have to be aware of your brush strokes and the pot life of the material or it will leave obvious strokes in the coating. To ensure a consistent coat, mix smaller batches one at a time to avoid getting too far into the pot life. The manufacturer recommends mixing no more than 1/2 gallon at a time if brushing. Always try to maintain even brush strokes to achieve a light orange peel texture. If you are looking to get a more aggressive texture, using Als Liner Rubber Crumb Additive is recommended.
Brushing Als Liner DIY Truck Bed Liner Kits will give you a thinner coating than spraying. It may take multiple coats to achieve the desired thickness. The average brush application will yield 10 to 15 mils per coat.
- Aggregate Additives
-
Als Liner DIY Truck Bed Liner Kits will accept virtually any aggregate. The most popular are sand, pebbles or rubber granules. The only restraint is making sure the size of the aggregate is small enough to be sprayed through the port of your Als Liner Spray Gun. You can find a large variety of sizes and colors at your local hardware store. Rubber load is commonly used on trailer gates and floors, as well as decks and entryways. With the right aggregate, Als Liner will not only provide durable, long lasting protection, but can save you, your employees, or your loved ones from the dangers of a slippery surface. With an aggregate additive, Als Liner provides a non-skid surface that can be hard to the touch. The manufacturers recommendation for aggregate mixture is a 1 to 4, or 25% mix. If you are mixing 1 gallon of Als Liner, they recommend approximately 4 cups of rubber granules.
- Metallic Flake Additives
-
The easiest and most effective way to add metallics to your coating is to spray your base coat with the color of your choice, then mix a micro batch of natural material and add ultra fine metallics. It is very important to only use ultra fine metallics to retain the strength of Als Liner. An inexpensive place to get this type of flake is Lure Kraft, which provides ultra fine metallics for fishing lures. The amount of metallic flake you add to the mix is up to you. You can go with a heavy mix and get a thick layer of metallic or lighten the load for a subtle flake overlay. Mix the micro batch and mist coat the entire area immediately after spraying the base coat. The thin mist coat will bond to the uncured base coat and dry clear to give you a brilliant metallic look.
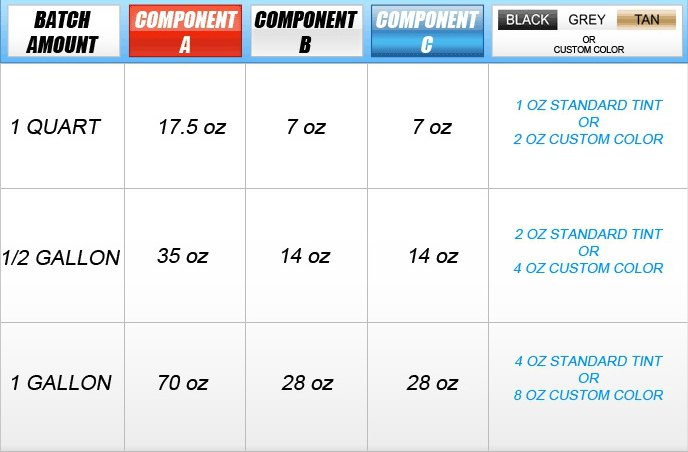
Als Liner DIY Truck Bed Liner Kits are pre-measured to make a 1 gallon application right out of the box. If this amount works for you, just combine all of the containers together, mix and apply. Many Als Liner customers prefer smaller batches to create different color combinations, smaller protective coating areas, and other custom applications. With the Als Liner patented 3 part batch system, its easy to mix smaller amounts of Als Liner and keep the rest for another project. Simply follow the mix chart below and you are ready to spray.
The standard mixing ratio is 2.5 parts Als Liner A Component to 1 part B to 1 part C. See below for standard mixing and tint ratios.
Als Liner can be easily cleaned from the substrate and from the application gun. Below are the manufacturers recommendations for cleaning spills, over spray and left over material in your spray gun.
Cleaning up over spray or spilled material
There are several methods for cleaning up Als Liner material. The easiest and recommended manner of cleaning up over spray or spilled material is to wipe the material up using denatured alcohol and any type of cloth that suits the surface you are wiping. This will remove the coating prior to it setting up and prevent you from having to scrape the dried material. If you have a spill or over spray on a finished surface, it should peel off once it has set up. Be careful as Als Liner will adhere to scuffs and scratches that you might not see. The manufacturer recommends getting the material off before it sets up.
Cleaning your Al's Liner Spray Gun
Cleaning your Als Liner Truck Bed Liner Spray Gun is as simple as it gets. Before pouring material into the Als Liner Spray Gun hopper, spray the inside of the gun and hopper with a non-silicon mold release or simply wipe in a fine layer of Vaseline. Once you have finished with your application, turn the gun and hopper upside down in a bucket or on a disposable surface. This allows excess material to drain out of the hopper. Allow the left over material to set up for 6-24 hours and then simply dismantle the gun. You will be able to remove the hardened materials from both the hopper and the gun. If you are continually spraying the same color, there is no need to clean the gun between batches - just be sure not to let the materials harden between spray applications. If you do need to switch colors and the gun has wet material left, pour some denatured alcohol into the reservoir to break down the remaining material. Pour out the alcohol and dismantle the gun, cleaning each part to insure no contamination of the old color.
Below is a list of items you will need to apply your Als Liner DIY Truck Bed Liner Kit. Many of these are items you might find in your garage already. If youre missing something, look for a link to the Als Liner Accessories page - whatever you need to get the job done, CARiD and Als Liner have you covered.
Personal Protection
You must wear personal protection when mixing and spraying Als Liner DIY Truck Bed Liner Kits. The recommended respirator to use is a dual cartridge chemical respirator. Als does not release MDI during the spray process so supplied air respiration is not required and you do not have to have a spray booth. The manufacturer does not recommend wearing disposable painters suits as there will be over spray. Also recommended are latex or rubber gloves for protection of your hands and appropriate eye protection during the mix and application processes.
Masking Materials
You can use a variety of materials to mask the area you do not want sprayed. You can use materials such as paper or plastic. The manufacturer recommends using plastic. Als Liner is a heavy material on paper and can cause problems when removing the paper masking. Plastic carries the weight better to prevent tearing during the unmasking process.
Tape
You will want to use a good automotive grade masking tape to determine your spray lines. Als gives you approximately a 45 minute window to remove the masking and still get a nice crisp, clean line. You do not need wire tape. You will want to pull the tape line at a 45 degree angle back over the sprayed area to get a clean crisp edge.
Sand Paper or Abrasion Tools
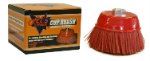
You will want to scratch and scuff the area to be sprayed using a 180 grit or more aggressive abrasive. You can use sand paper, cup brushes, needle scaler, etc. You just need to make sure the entire area is thoroughly scratched and cleaned well before priming.
Solvents and Cleaners
You will want a good quality pre-paint cleaner to wipe down the spray area after scratching and scuffing the surface. You need to insure any debris and residue is removed prior to priming the area and applying Als Liner. You can also use solvents such as denatured alcohol or lacquer thinner to clean up any spillage or mishaps.
Air Compressor
If you are spraying Als Liner DIY Truck Bed Liner Kits, you will need an air compressor. You need a minimum of 7 cfm capacity and 25 psi at the gun. This is the recommendation for the Als Liner Spray Gun. Keep in mind that you do not want to exceed 55 psi at the gun. This will generate too much over spray which wastes material. You can achieve virtually any texture from 25 to 55 psi.
Mold Release
You will want to treat your Als Liner Spray Gun with a mold release prior to pouring the liner in. This will allow for easy cleanup. You can also use Vaseline to coat the interior of the gun to help facilitate cleaning. If you do not use mold release or Vaseline prior to use, you should flush the gun immediately after application with denatured alcohol or lacquer thinner.
For an easy cleanup every time, try Als Liner LMR!
Brushes and Rollers
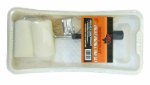
If you plan to roll apply Als Liner DIY Truck Bed Liner Kits, you will want a combination of brushes and roller to do the job. See the brush and roller techniques on the spray techniques page at CARiD for more information.
With the Als Liner Roller/Brush Kit, the perfect finish is at your fingertips!